Unveiling the Secrets of Growing a Thriving Lemon Plant Indoors!

Introduction:

Lemon plants, with their glossy foliage and vibrant fruits, add a refreshing touch to any indoor garden. Beyond their ornamental value, these citrus wonders offer the allure of homegrown lemons right at your fingertips. Cultivating a lemon plant indoors is not only rewarding but also surprisingly straightforward, even for novice gardeners. In this comprehensive guide, we’ll delve into the essential steps and expert tips to help you grow a healthy and fruitful lemon plant in your home.

Choosing the Right Variety

Before you embark on your lemon-growing journey, it’s crucial to select the right variety for indoor cultivation. Dwarf lemon varieties, such as Meyer lemons or Ponderosa lemons, are ideally suited for growing indoors due to their compact size and adaptability to container life.

Selecting the Perfect Container

When it comes to containers for lemon plants, bigger is often better. Choose a container that provides ample space for root development and drainage. Opt for a pot with drainage holes to prevent waterlogging, and consider placing a saucer underneath to catch excess water.

Preparing the Potting Mix

Lemon plants thrive in well-draining, slightly acidic soil. Prepare a potting mix by combining equal parts of peat moss, perlite, and compost. This nutrient-rich blend provides the ideal growing medium for your lemon plant and ensures adequate aeration and moisture retention.

Planting Your Lemon Tree

  1. Preparing the Soil: Fill the bottom of the container with a layer of potting mix, then gently remove the lemon plant from its nursery container and place it in the center of the pot.
  2. Backfilling: Fill the remaining space around the plant with potting mix, ensuring that the top of the root ball is level with the soil surface. Firmly pat down the soil to eliminate air pockets.
  3. Watering: Give your newly planted lemon tree a thorough watering to settle the soil. Water until it begins to drain from the bottom of the pot, then empty the saucer to prevent water buildup.

Light and Temperature Requirements

Lemon plants require ample sunlight to thrive, so choose a sunny location for your indoor garden. Place your lemon tree near a south-facing window where it can receive at least 6-8 hours of sunlight per day. During the winter months, consider supplementing natural light with a grow light to ensure optimal growth.

Maintain a consistent temperature range of 60-70°F (15-21°C) during the day and slightly cooler temperatures at night. Avoid placing your lemon plant near drafty windows or heating vents, as extreme temperature fluctuations can stress the plant.

Watering and Fertilizing

  1. Watering Frequency: Lemon plants prefer evenly moist soil but are susceptible to root rot if overwatered. Allow the top inch of soil to dry out between waterings, then water thoroughly until excess moisture drains from the bottom of the pot.
  2. Fertilizing: Feed your lemon plant regularly during the growing season with a balanced, water-soluble fertilizer formulated for citrus plants. Apply fertilizer every 4-6 weeks from spring to early fall, following the manufacturer’s instructions for dilution and application rates.

Pruning and Maintenance

Regular pruning is essential for shaping your lemon plant and promoting healthy growth. Remove any dead, damaged, or crossing branches, as well as any suckers or shoots emerging from the base of the plant. Prune selectively to maintain an open, airy canopy that allows sunlight to penetrate the interior of the plant.

Pest and Disease Control

Keep an eye out for common pests such as aphids, scale insects, and spider mites, which can infest lemon plants indoors. If you notice any signs of pest infestation, such as yellowing leaves or sticky residue, treat the affected plant with insecticidal soap or neem oil spray.

Harvesting Your Lemons

With proper care and patience, your lemon plant will reward you with a bountiful harvest of fresh, juicy fruits. Most lemon varieties take 6-12 months to ripen, depending on environmental conditions and the age of the plant. Harvest lemons when they reach full size and color, giving them a gentle twist to detach them from the branch.

Conclusion

Growing a lemon plant indoors is a fulfilling endeavor that brings the joy of citrus cultivation into your home. By following these expert tips and guidelines, you can cultivate a healthy, productive lemon tree that provides an abundant harvest of homegrown lemons year-round.

Happy Gardening!

Maintaining a Clean Home Oasis: Tips for Growing Indoor Plants Dirt-Free!

Introduction:

Bringing the beauty of nature indoors with houseplants adds a touch of greenery and tranquility to any living space. However, keeping your home clean while nurturing indoor plants can sometimes pose a challenge. With the right strategies, it’s possible to enjoy the benefits of indoor gardening without sacrificing cleanliness. In this article, we’ll explore practical tips for maintaining a dirt-free home while growing indoor plants.

Choose Clean Indoor Plants:

When selecting indoor plants for your home, opt for varieties that are less likely to shed soil or create messes. Look for plants with compact root systems or those that come in clean, soil-free growing mediums like hydroponic setups or air plants. Succulents, snake plants, pothos, and peace lilies are excellent choices known for their low-maintenance nature and minimal mess.

Use Containment Solutions:

To prevent soil spills and water leakage, consider using containment solutions such as decorative pots with built-in saucers or trays. These containers not only catch excess water but also help contain any soil that may escape during watering or transplanting. Additionally, placing plants on trays or trays lined with decorative rocks can further minimize messes and make cleanup easier.

Implement Drip Trays and Watering Techniques:

Drip trays placed underneath pots are essential for catching water runoff during watering sessions. Opt for trays that match the size and aesthetic of your plant containers to maintain a cohesive look. When watering your plants, do so carefully and avoid over-watering to minimize the risk of spills and soil displacement. Using a watering can with a narrow spout or a watering globe can help control water distribution and reduce splashing.

Practice Regular Maintenance:

Routine maintenance tasks such as dusting, pruning, and repotting can help keep indoor plants healthy and minimize messes. Dusting plant leaves with a soft cloth or gentle spray of water removes accumulated dirt and enhances photosynthesis. Pruning dead or yellowing leaves not only improves plant appearance but also prevents soil contamination. Additionally, repotting plants as needed allows for root inspection and prevents overcrowding, which can lead to soil spillage.


Similar Posts


Employ Protective Coverings:

For extra protection against soil spills and water damage, consider using protective coverings such as plastic or silicone mats placed underneath plant containers. These mats provide an additional barrier between the plant and the surface below, preventing water stains and soil residue. Alternatively, decorative waterproof trays or trays lined with waterproof liners can serve as stylish and functional solutions for containing messes.

Opt for Soilless Growing Mediums:

Soilless growing mediums such as coco coir, perlite, or peat moss offer an alternative to traditional potting soil and can help minimize dirt-related messes. These lightweight and sterile mediums provide excellent aeration and drainage for plant roots while reducing the risk of soil-borne pests and diseases. Hydroponic systems, aeroponic towers, and moss poles are innovative soil-free growing methods that eliminate the need for messy soil altogether.

Establish Cleaning Routines:

Regular cleaning routines are essential for maintaining a dirt-free home environment while growing indoor plants. Vacuuming or sweeping floors, wiping down surfaces, and dusting furniture help remove accumulated dirt and debris. Pay special attention to areas around plant containers and windowsills, where soil and dust tend to accumulate. Consider using a handheld vacuum or dusting brush to clean hard-to-reach spaces and tight corners.

Conclusion:

With proper planning and maintenance, it’s possible to enjoy the beauty of indoor plants without compromising cleanliness in your home. By selecting clean plant varieties, using containment solutions, practicing regular maintenance, and implementing protective measures, you can create a dirt-free oasis that enhances both your living space and your well-being. With these tips in mind, you can cultivate a harmonious balance between nature and cleanliness indoors.

Happy Gardening!

Things I should have known before growing Orchids!

Introduction:

Orchids, often revered for their timeless beauty and versatility, have captured the hearts of plant enthusiasts and decorators alike. These exquisite flowers can serve as stunning decorations for various occasions or be a thoughtful gift for loved ones. With over two hundred distinct varieties, including Dendrobium, Phalaenopsis, Vanda, and Cattleya, orchids offer a wide range of choices. What sets orchids apart is their remarkable longevity, as they can thrive for many months even when separated from their parent plants.

For those eager to try their hand at growing orchids, it’s a rewarding endeavor that requires patience and attention to specific factors. Here are some essential considerations to ensure your orchid cultivation journey begins on the right foot:

Choosing the Right Orchid:

If you’re new to orchid cultivation, it’s best to start with varieties that are easier to grow and require less maintenance, such as Dendrobium and Phalaenopsis.

Climate Considerations:

It’s crucial to remember that growing conditions vary based on your geographical location. Advice and guidance found online or in videos may not be applicable to your local climate. Ensure you follow instructions that are relevant to your region’s weather patterns.

Timing Matters:

Orchid cultivation is affected by seasonal changes. Typically, it’s best to start during the winter season so you can expect blooms in the summer. However, Dendrobium and Phalaenopsis can bloom outside of these traditional seasons.

Ideal Placement:

The location where you place your orchids is pivotal for their growth and flowering. Provide indirect sunlight and ensure sufficient air circulation for healthy development. Place it near the window or in Balcony which gets indirect sunlight.


Similar Posts


Acquiring Orchids:

Once you’ve taken these factors into consideration, the next step is to embark on the journey of acquiring orchids. Orchids have always held a special place in my heart, but their price often deterred me from making a purchase. Being an avid gardener, I frequently visited a local nursery where I stumbled upon these exquisite blooms. However, their price tag was often seven to eight times higher than the plants I typically acquired.

One day, while browsing a local market, I chanced upon a lady selling a delicate orchid seedling for just 100 rupees. Though it appeared frail, I couldn’t resist the temptation and made it my very first orchid, one that has yet to bloom even after a year and a half. I patiently awaited signs of growth, only to witness its leaves falling off without any indication of new branches. It was then that I decided to invest in another orchid, this time from the nursery, purchasing a bushy plant without flowers for 250 rupees. Unfortunately, this orchid too refused to bloom.

Determined to unlock the secret of successful orchid care, I eventually acquired an orchid in full bloom, and from that point on, I was hooked. Today, my collection boasts an impressive array of 19 orchids, including 13 dendrobiums, 2 phalaenopsis, 2 catellya, 1 vanda, and 1 Rhyncolysis. As my passion for orchids grew, I delved into research online and stumbled upon websites that offered these captivating plants at more affordable rates.

During my online exploration, I discovered that one of the best places to buy orchids, or any other plants for that matter, is through Facebook Marketplace. There are numerous dedicated groups on Facebook, such as ” Indian Orchid Growers Association & Sellers,” ” Orchid Growing TIPS & TRICKS, India,” ” Kolkata Orchid Growers Association,” “Buy Sale Plants”, “Sale Point”and many more, each catering to specific interests and regions. These groups provide a diverse selection of orchids and other plants at reasonable prices, offering enthusiasts the opportunity to explore a wide variety of options for their collections.

Pro Tips:

Purchasing orchids can sometimes be a daunting task due to their perceived high cost. However, there are budget-friendly ways to start your orchid collection. Consider these tips:

a. Start Small: Begin with affordable orchid seedlings or less expensive options like dendrobium to gain experience.

b. Online Marketplaces: Explore online platforms like Facebook Marketplace or specialized groups dedicated to orchid enthusiasts, where you can find a variety of orchids at reasonable prices. Here is a list of Facebook Groups and websites selling orchids at affordable prices.

Facebook Groups:

Indian Orchid Growers Association & Sellers

Orchid Growing TIPS & TRICKS, India

Kolkata Orchid Growers Association

Kerala Orchids & All Orchid Species

Orchid Addiction— Exchange and sale

Websites:

Pots And Petals

OrchidZone

Guide To Orchid Care

Now that you’ve selected your orchids, here’s a basic guide to their care:

Potting Your Orchids:

Use a potting mix comprising tree bark (or coconut husk), charcoal, and brick pieces. Opt for orchid pots with ample drainage holes, available in clay or plastic options.

Sunlight Requirements:

As mentioned earlier orchids thrive with indirect sunlight, which is vital for blooming. Avoid overexposure to direct sunlight, as it can harm the leaves.

Proper Watering:

Water your orchids once a week in winter and twice a week in summer by immersing the pot in a tub of water or using the ice cube method. This ensures even moisture without overwatering. The ice cube method was recommended by the seller from whom I purchased my Phalaenopsis orchid, and I have found it to be highly effective and convenient in maintaining proper hydration for my orchids.

Fertilizing:

While numerous orchid fertilizers are readily accessible online, I personally abstain from using them due to the precise dosage requirement; an excess can potentially harm the plants. If you do opt for chemical fertilizers, ensure that you apply them on the same day as watering your orchids. My preferred and reliable alternative is rice water, a natural and effective fertilizer that not only supports overall growth but also enhances flowering.

Conclusion:

Embarking on the journey of growing orchids can be a deeply satisfying experience for any gardening enthusiast. By following these tips and considerations, you’ll be well on your way to nurturing these exquisite flowers and enjoying their timeless beauty. So, start cultivating orchids and embrace the joys of gardening.

Happy gardening!

Unlocking the Green Power: Growing Microgreens and Its Abundant Benefits!

Introduction

In today’s fast-paced world, where health consciousness and sustainability go hand in hand, microgreens have emerged as a rising star on the culinary scene. These tiny, vibrant, and nutrient-packed greens have garnered immense popularity not only for their culinary appeal but also for their ease of cultivation. In this article, we will delve into the art of growing microgreens and explore the myriad benefits they bring to our plates and our planet.

What Are Microgreens?

Microgreens are edible plants that are harvested at an early stage of growth, typically after the first true leaves have developed. They are a diverse group of tiny greens, including varieties like kale, arugula, radishes, and mustard greens, among others. Microgreens burst with flavor and color, making them a favorite among chefs and home cooks alike.

Cultivation: Simple and Accessible

One of the most significant advantages of microgreens is their accessibility to virtually anyone, regardless of their gardening experience or space constraints. Here’s a step-by-step guide to growing microgreens:

  1. Choose the Right Container

 You can grow microgreens in various containers like trays, shallow pots, or even repurposed plastic containers with drainage holes.

2. Select Your Seeds

 Opt for high-quality, untreated seeds of your preferred microgreen varieties. Organic seeds are always a good choice.

Commonly grown microgreen vegetable species include beet, Swiss chard, spinach, lettuce, mustard, fenugreek, chicory, endive, cabbage, carrot, celery, fennel, leek, onion, and cucumber.

3. Prepare the Growing Medium

Fill your chosen container with a soilless growing medium, such as peat moss, coconut coir or hemp mats. Ensure it’s well-moistened but not waterlogged.

4. Sow the Seeds

Sprinkle the seeds evenly over the growing medium, pressing them gently into the soil. You don’t need to bury them.

5. Provide Adequate Light

Microgreens thrive in bright, indirect sunlight. If natural light is insufficient, you can use fluorescent or LED grow lights. The optimal soil temperature range for germinating microgreens is between 60 and 75°F, while air temperatures should be kept between 60 and 70°F.

6. Maintain Proper Moisture

 Keep the growing medium consistently moist, but avoid overwatering, as this can lead to mold and rot. Microgreens can easily germinate with the proper humidity level of 90%.

7. Harvest at the Right Time

Most microgreens are ready to harvest within 7-14 days, depending on the variety. Use scissors to cut them just above the soil line.


Similar Posts


Benefits of Microgreens

The decision to grow microgreens goes beyond their delightful taste and visual appeal. Let’s explore some of the benefits they offer:

  • Exceptional Nutrient Density

Despite their diminutive size, microgreens are nutritional powerhouses. Studies have shown that they can contain up to 40 times more vitamins, minerals, and antioxidants than their mature counterparts.

  • Culinary Versatility

Microgreens add a burst of flavor and texture to dishes, making them a versatile ingredient for salads, sandwiches, soups, and garnishes. Their diverse flavors range from peppery to nutty, catering to a wide range of taste preferences.

  • Rapid Growth

Microgreens are one of the fastest-growing crops, making them an ideal choice for impatient gardeners. You can enjoy a fresh harvest in just a matter of days or weeks.

  • Sustainable Farming

Cultivating microgreens at home reduces the need for transportation and packaging, contributing to a smaller carbon footprint. Plus, you can grow them year-round, regardless of the weather.

  • Cost-Effective

Buying microgreens from the store can be pricey. By growing your own, you save money while enjoying a continuous supply of fresh greens.

  • Health Benefits

Incorporating microgreens into your diet can boost your immune system, support digestion, and help manage weight due to their high fiber content.

  • Educational Experience

 Growing microgreens is an excellent way to introduce children to gardening and healthy eating habits. It’s a hands-on, educational experience that can foster a lifelong love for plants and nutrition.

Conclusion

Microgreens are proof that great things come in small packages. With their ease of cultivation, remarkable nutrient density, and versatility in the kitchen, they offer a plethora of benefits to both seasoned gardeners and newcomers to the world of green thumbs. Moreover, growing microgreens is an eco-conscious choice that aligns with the growing demand for sustainability and fresh, locally sourced produce.

So, whether you have a green thumb or are just starting your gardening journey, consider adding microgreens to your repertoire. Not only will you enjoy a continuous supply of flavorful, nutritious greens, but you’ll also be contributing to a healthier, more sustainable future for all.

Happy Gardening!

Terrarium Gardening: A Miniature Oasis of Greenery for Your Home!

In today’s fast-paced world, people are constantly seeking ways to bring nature closer to their lives, even when space and time are limited. Terrarium gardening has emerged as a charming solution, allowing you to create a captivating, miniature ecosystem right in your own home. In this article, we’ll explore the art of terrarium gardening, its benefits, and how to create your own stunning terrarium.

The Enchantment of Terrariums

Terrariums are like small, self-contained worlds enclosed within glass containers. These enchanting miniature gardens are captivating not only for their beauty but also for the sense of tranquility they bring. Whether you’re a seasoned green thumb or a novice gardener, terrariums are the perfect way to indulge your love for plants in a compact and manageable space.

Benefits of Terrarium Gardening

1. Low Maintenance

Terrariums are exceptionally low-maintenance compared to traditional outdoor gardens. With their enclosed environment, they require minimal attention and watering. In fact, many terrariums can thrive with just a monthly watering, making them ideal for individuals with busy lifestyles.

2. Year-Round Greenery

Terrariums allow you to enjoy lush greenery year-round, regardless of the season or climate. This is especially appealing to those living in regions with harsh winters or dry summers.

3. Stress Reduction

Studies have shown that indoor plants, including those in terrariums, can reduce stress and promote relaxation. The act of caring for your tiny ecosystem can provide a soothing and rewarding escape from the stresses of daily life.

4. Space-Saving

Terrariums are perfect for those with limited living space. They can be placed on tabletops, windowsills, or even hung from the ceiling, adding a touch of nature to any room without taking up much space.

5. Creativity Unleashed

Creating a terrarium allows you to unleash your creativity. You can personalize your mini garden with various plants, decorative elements, and themes, making each terrarium a unique work of art.


Similar Posts


Building Your Terrarium

Now that you’re excited about the prospect of having your own mini garden, let’s get into the steps of building your terrarium:

Materials You’ll Need:

  • A glass container or jar with a lid or cork stopper.
  • Small pebbles or gravel for drainage.
  • Activated charcoal (available at garden centers) to prevent mold and odors.
  • Potting soil appropriate for your chosen plants.
  • Various small plants are suitable for terrariums (succulents, air plants, ferns, and moss are popular choices).
  • Decorative elements like small figurines, stones, or miniature furniture (optional).
  • Long-handled tweezers or chopsticks for arranging and planting.

Step-by-Step Guide:

  1. Start by placing a layer of small pebbles or gravel at the bottom of your glass container to create a drainage layer. This helps prevent root rot by allowing excess water to collect at the bottom.
  2. Add a thin layer of activated charcoal over the pebbles. This acts as a natural filter, purifying the air inside the terrarium and preventing unpleasant odors.
  3. On top of the charcoal, spread a layer of potting soil. The depth will depend on the size of your container and the types of plants you’re using. Generally, you want enough soil to accommodate the root systems of your chosen plants.
  4. Plant your chosen plants in the soil with caution. Use the long-handled tweezers or chopsticks to position them as desired. Be mindful of the size of your container; overcrowding can lead to plant competition for resources.
  5. Add any decorative elements you like. This is where your creativity can shine. Miniature figurines, small stones, or tiny furniture pieces can enhance the visual appeal of your terrarium.
  6. Water your terrarium sparingly. Overwatering can be a common mistake. Use a spray bottle to mist the soil and plants, or pour a small amount of water into the soil, being careful not to flood the container.
  7. Place the lid or cork stopper on your terrarium to create a closed environment. This will help maintain the humidity levels inside, ensuring that your plants thrive.

Maintaining Your Terrarium

To keep your terrarium healthy and thriving, follow these maintenance tips:

  • Monitor Moisture: Keep an eye on the moisture levels inside the terrarium. If you notice excessive condensation, remove the lid for a few hours to allow excess moisture to evaporate.
  • Trim and Prune: As your plants grow, you may need to trim and prune them to maintain the desired appearance and prevent overcrowding.
  • Rotate: Rotate your terrarium occasionally to ensure all sides receive adequate light and your plants grow evenly.
  • Fertilize Sparingly: Fertilize your terrarium sparingly, as the enclosed environment doesn’t require as much nutrients as outdoor gardens.

Conclusion

Terrarium gardening is a delightful hobby that brings nature’s beauty into your home while providing a sense of tranquility and creativity. Whether you’re a busy urbanite or a seasoned gardener, creating your own mini ecosystem is a rewarding and therapeutic experience. So, why not embark on this green journey and discover the enchanting world of terrariums today? Your miniature oasis of greenery awaits!

Happy Gardening!

Discover 15 Low-Light Plants for Your Indoor Garden Oasis!

Indoor gardening is a rewarding and therapeutic hobby that allows you to bring a touch of nature into your living spaces. However, not every home has abundant natural light, which can make plant selection a bit challenging. But fear not! There is a diverse range of low-light plants perfectly suited for those dimmer corners of your home. In this article, we’ll introduce you to 15 low-light plants that thrive in indoor settings, adding beauty and tranquility to your living space.

1. Snake Plant (Sansevieria trifasciata)

The Snake Plant, also known as Mother-in-Law’s Tongue, is a hardy, low-maintenance plant that can tolerate low light conditions. Its striking upright leaves make it an attractive addition to any room.

2. Peace Lily (Spathiphyllum)

The Peace Lily is famous for its elegant white blooms and air-purifying properties. It’s well-suited for low light areas and can thrive in humid environments.

3. ZZ Plant (Zamioculcas zamiifolia)

The ZZ Plant is a robust plant with glossy, dark green leaves. It’s virtually indestructible and can thrive in very low light, making it a perfect choice for beginners.

4. Pothos (Epipremnum aureum)

Pothos is a popular trailing plant that can thrive in low to moderate light. Its variegated leaves add a pop of color to your indoor garden.

5. Cast Iron Plant (Aspidistra elatior)

As the name suggests, the Cast Iron Plant is incredibly resilient and can tolerate low light, neglect, and fluctuations in temperature. It’s an excellent choice for low-maintenance indoor gardening.

6. Chinese Evergreen (Aglaonema)

Chinese Evergreens come in various striking varieties, all of which are known for their adaptability to low-light conditions. They add a touch of elegance to your indoor garden.

7. Boston Fern (Nephrolepis exaltata)

Boston Ferns are classic indoor plants that can thrive in low to moderate light. Their lush, feathery fronds add a soft and refreshing ambiance to your space.

8. Spider Plant (Chlorophytum comosum)

The Spider Plant is renowned for its air-purifying qualities and can thrive in indirect light. It produces arching green and white striped leaves, making it an attractive choice.

9. Dracaena (Dracaena spp.)

Dracaenas are a diverse group of plants with various leaf colors and shapes. Many dracaena varieties, such as the Dragon Tree, can adapt to low light conditions.


Similar Posts


10. Parlor Palm (Chamaedorea elegans)

Parlor Palms are compact and elegant plants that can tolerate low light and dry indoor air. They’re perfect for adding a tropical touch to your space.

11. Peperomia (Peperomia spp.)

Peperomias are small, easy-to-care-for plants that do well in low to moderate light. They come in various textures and colors, making them a lovely addition to any indoor garden.

12. Philodendron (Philodendron spp.)

Philodendrons are low-maintenance plants that can adapt to a range of light conditions, including low light. Their heart-shaped leaves add a touch of charm to your home.

13. Lucky Bamboo (Dracaena sanderiana)

Lucky Bamboo is a symbol of good fortune and is well-suited for low light conditions. It’s often grown in water, making it an interesting and low-maintenance choice.

14. Maranta (Maranta leuconeura)

Maranta, also known as the Prayer Plant, features beautiful, patterned leaves that fold upward in the evening. It’s a delightful low-light plant option.

15. Dieffenbachia (Dieffenbachia spp.)

Dieffenbachias are known for their striking variegated leaves. They can adapt to low light areas but keep them away from direct sunlight.

Conclusion

With these 15 low-light indoor plants, you can transform even the dimmest corners of your home into a thriving garden oasis. Whether you’re a seasoned indoor gardener or just starting out, these plants offer beauty, air-purifying benefits, and a sense of tranquility to your indoor spaces.

Happy gardening!

Elevate Your Greenery: A Guide to Hanging Plants for Indoor and Outdoor Beauty!

Hanging plants are more than just a trend in home and garden decor—they’re a stunning way to breathe life into your living spaces and outdoor areas. These versatile plants bring a touch of nature to otherwise unused spaces, creating a calming and aesthetic atmosphere. In this article, we’ll explore the world of hanging plants, their benefits, and the best varieties to elevate your space.

Why Choose Hanging Plants?

Hanging plants offer numerous advantages, making them a must-have addition to your home or garden:

1. Space-Saving Solution: Hanging plants maximize your living space, utilizing vertical areas and freeing up precious floor space.

2. Enhanced Aesthetics: They add a dynamic and visually pleasing dimension to your decor, creating a lush and inviting environment.

3. Air Purification: Many hanging plants are excellent air purifiers, improving indoor air quality by removing toxins and adding oxygen.

4. Stress Reduction: The presence of greenery has been proven to reduce stress and boost mental well-being, making your space more relaxing.

5. Versatility: Hanging plants are suitable for both indoor and outdoor settings, allowing you to incorporate them into various design schemes.

Popular Varieties of Hanging Plants

Let’s delve into some of the most beloved and low-maintenance hanging plants that you can introduce to your living spaces:

1. Spider Plant (Chlorophytum comosum)

The Spider Plant (Chlorophytum comosum) is a classic and easy-to-grow houseplant known for its air-purifying qualities and striking appearance. Its long, arching leaves are typically green with white stripes, creating a visually appealing contrast, and adding an elegant touch to any room. Spider Plants thrive in indirect light but can tolerate low-light conditions, making them perfect for various indoor settings. They produce small offsets or “spiderettes” that dangle from the parent plant, making them a favorite for hanging baskets. Low-maintenance and adaptable, Spider Plants are an excellent choice for both novice and experienced plant enthusiasts.

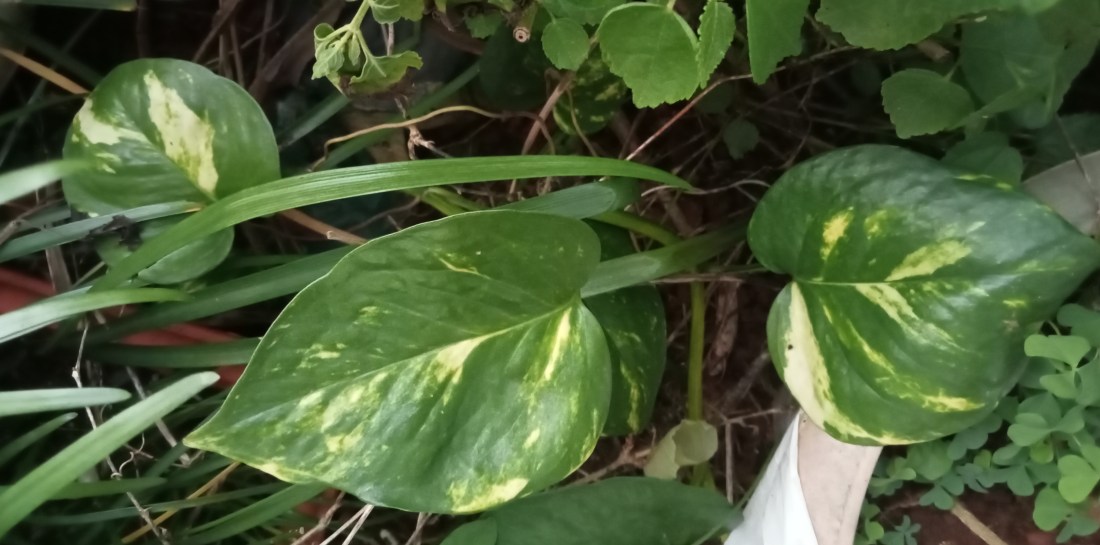
2. Pothos (Epipremnum aureum)

Pothos, also known as Devil’s Ivy, is a popular, versatile, and easy-to-care-for hanging plant. It’s loved for its heart-shaped leaves and easygoing nature. This trailing plant comes in various leaf colors, including classic green, variegated, and neon yellow, adding a pop of color to indoor spaces. Pothos is an excellent choice for beginners due to its low-maintenance requirements and adaptability to various light conditions, including low light. It’s known for its air-purifying qualities, removing toxins from the air, making it a healthy addition to any room. Regular pruning helps maintain its lush and vibrant appearance, making it a timeless favorite among plant enthusiasts.

3. String of Pearls (Senecio rowleyanus)

The String of Pearls (Senecio rowleyanus) is a captivating and distinctive succulent characterized by its cascading stems adorned with small, bead-like leaves, resembling a string of pearls. This plant is a favorite choice for hanging baskets or trailing from shelves, adding a unique and eye-catching element to indoor spaces. String of Pearls prefers bright, indirect light and well-draining soil, making it relatively easy to care for. It’s best to water sparingly, allowing the soil to dry out between waterings, as overwatering can lead to root rot. With its quirky appearance, this succulent is a conversation starter and a stylish addition to any plant collection.

4. Boston Fern (Nephrolepis exaltata)

The Boston Fern (Nephrolepis exaltata) is a popular choice for indoor hanging baskets and outdoor garden accents, known for its lush, feathery fronds. This classic fern variety thrives in high humidity and filtered, indirect light, making it an ideal plant for bathrooms or shady outdoor areas. Boston Ferns are excellent air purifiers, enhancing indoor air quality by removing pollutants and adding oxygen. They require consistently moist soil, but it’s crucial not to overwater them, as they are sensitive to waterlogging. With their vibrant green foliage and graceful arching fronds, Boston Ferns bring a refreshing and tropical feel to any space.


Similar Posts


5. Burro’s Tail (Sedum morganianum)

Burro’s Tail (Sedum morganianum) is a distinctive and charming succulent known for its trailing stems covered in plump, blue-green leaves that resemble hanging beads. This plant is often referred to as the “Donkey Tail” due to its unique appearance. It’s relatively easy to care for and thrives in bright, indirect light, making it an excellent choice for hanging baskets or decorative containers. Burro’s Tail is drought-tolerant and prefers to dry out between waterings. It’s an excellent choice for sunny spots.With its unusual beauty, it adds a touch of whimsy and elegance to any indoor or outdoor space.

6. Air Plants (Tillandsia spp.)

Air Plants, scientifically known as Tillandsia spp., are remarkable and unique in the plant world because they don’t require soil to grow. These epiphytic plants absorb nutrients and moisture through their specialized trichomes, making them perfect for creative displays in decorative holders or hanging arrangements. Air Plants come in various sizes and shapes, from small and delicate to larger, statement-making specimens. They thrive in bright, indirect light and require occasional misting or soaking to maintain their health and vibrancy. With their quirky, otherworldly appearance, Air Plants are a favorite among plant enthusiasts and a versatile addition to any indoor garden.

7. Lipstick Plant (Aeschynanthus radicans)

The Lipstick Plant (Aeschynanthus radicans) is a captivating tropical houseplant known for its striking red, tubular flowers that resemble lipstick tubes, hence its name. It’s a beautiful and exotic hanging plant that blooms intermittently. This charming plant also boasts glossy, dark green foliage that contrasts beautifully with its vibrant blooms. It’s a relatively low-maintenance indoor plant that can thrive in moderate to bright indirect light. Lipstick Plants are excellent choices for hanging baskets, as their trailing vines create an eye-catching display. Regular pruning can help promote more vigorous growth and enhance the appearance of this unique and delightful plant.

8. English Ivy (Hedera helix)

English Ivy (Hedera helix) is a classic and versatile trailing plant known for its lush, dark green leaves that create a charming, cascading effect. It’s a popular choice for both indoor and outdoor gardens, often used to cover walls, trellises, and fences. This evergreen vine is hardy and can adapt to a variety of conditions, making it a reliable addition to any landscape. English Ivy is not only aesthetically pleasing but also a natural air purifier, helping to improve indoor air quality. Careful pruning can maintain its elegant appearance and prevent it from becoming overly invasive in outdoor settings.

9. Tangled heart (Plectranthus prostratus)

The Tangled Heart plant, also known as Ceropegia woodii, is a captivating trailing succulent that’s beloved for its unique heart-shaped leaves and charming vining habit. Its delicate, variegated foliage features shades of green and silver, adding an elegant touch to any space. This plant is known for its resilience and ability to thrive in indirect light, making it an ideal choice for indoor gardening. The Tangled Heart plant’s trailing vines can gracefully cascade from hanging baskets or cascade down shelves, creating a visually stunning and low-maintenance green display. Whether you’re a beginner or a seasoned plant enthusiast, the Tangled Heart plant is sure to steal your heart with its enchanting appearance.

Hanging Plant Care Tips

To ensure your hanging plants thrive and remain vibrant, consider the following care guidelines:

Light: Determine the light requirements of your specific plant variety and place your hanging plants accordingly. Some prefer bright, indirect light, while others thrive in low-light conditions.

Watering: Avoid overwatering; let the top inch of soil dry out before watering again. Be mindful of the moisture needs of your particular plant.

Potting Soil: Use well-draining potting soil to prevent waterlogging, which can lead to root rot.

Humidity: Some hanging plants, like Boston Ferns, thrive in higher humidity. Mist your plants or place them in a humidity tray if needed.

Fertilizing: Feed your hanging plants with a balanced liquid fertilizer during the growing season, typically spring and summer.

Pruning: Regularly trim dead or yellowing leaves and spent blooms to encourage healthy growth and maintain a tidy appearance.

Conclusion

Hanging plants are not just decorations; they are living, breathing elements that can transform your indoor and outdoor spaces into lush, inviting retreats. Whether you’re a seasoned gardener or a novice, there’s a hanging plant variety perfect for your needs. So, elevate your greenery game and let nature hang around in style!

Happy Gardening!

Greening Your Space: Creative and Recycled Pots for Eco-Friendly Gardening!

In an era where sustainability and creativity go hand in hand, gardening enthusiasts are finding innovative ways to make their green spaces more eco-friendly. One such trend gaining momentum is the use of creative and recycled pots. These ingenious containers not only add a touch of uniqueness to your garden but also contribute to a more sustainable planet. In this article, we’ll explore the world of creative and recycled pots and discover how they can elevate your gardening game while helping the environment.

The Art of Creative Gardening

Gardening is often regarded as an art form, and creative pots are the artist’s palette. The possibilities are endless when it comes to adding flair to your garden with inventive containers. Here are some amazing tips to spark your imagination:

Repurposed Containers

Old wooden crates, vintage suitcases, and even discarded kitchenware can be transformed into charming planters. These containers not only save you money but also breathe new life into items that might have otherwise ended up in a landfill.

Vertical Gardens

Vertical gardening is an excellent solution for those with limited space. Use old pallets, shoe organizers, or gutters to create vertical planters that are not only space-efficient but also visually appealing.

Sculptural Planters

Unconventional materials like tires, concrete blocks, coconut shell, and driftwood can be fashioned into sculptural planters, adding a touch of modern artistry to your garden.

Mosaic Madness

Transform plain terracotta pots into works of art by covering them in colorful mosaic tiles. This DIY project can be a fun and creative way to involve the whole family in your gardening endeavors.


Similar Posts


Recycling to Create a Greener Future

The concept of recycling extends beyond just materials; it also applies to repurposing items that have outlived their original purpose. Recycling pots not only diverts waste from landfills but also reduces the need for new manufacturing, which can be resource-intensive. Here’s how you can join the recycling movement in gardening:

Tire Planters

Old tires can find new life as garden planters. With a bit of paint, these sturdy containers can add a pop of color and a touch of sustainability to your garden.

Fairy Garden in a Teacup and Tea Pots

Create a whimsical fairy garden in a teacup and tea pots by planting miniature plants and adding fairy figurines for charm.

Herb Garden in Mason Jars

Ideal for small plants like herbs and succulents due to their affordability, availability, and various sizes. Label small mason jars with herb names and cultivate a kitchen windowsill herb garden.

Bottle Planters

Glass bottles, when cut and polished, can become unique and elegant plant containers. Their translucent beauty can make your garden truly stand out.

Flower Display in Wine Bottles: Empty wine bottles can be transformed into plant pots by removing the top and filling them with soil and your chosen plant.

Use empty wine bottles to arrange long-stemmed flowers like sunflowers or dahlias for a unique centerpiece.

Broken Pot Gardens

Instead of discarding chipped or broken clay pots, use them creatively to build miniature gardens with different levels. This not only recycles the pots but also adds depth and dimension to your garden.

Succulent Garden in Tea Tins

These are another great choice for small plants; you can easily personalize them to match your decor. If you enjoy tea, repurpose tea tins for small plants, adding a touch of vintage flair to your space. Group various succulents in repurposed tea tins for an adorable windowsill display.

Hanging Garden in Tin Cans: Decorate and hang painted tin cans from wood or metal rods to create a hanging garden.

Hollowed Logs

Fallen tree logs can be hollowed out and turned into rustic planters. Their natural charm blends seamlessly with any garden style, making them a timeless choice.

Upcycled Furniture

Old chairs and tables can be repurposed as plant stands, offering both functionality and a touch of vintage charm to your garden.

Boots and Shoes

Old, unwearable footwear can be turned into unique planters; just remember to create drainage holes before adding soil.

Shoe Planter Wall: Hang old shoes on a wall or fence, filling them with trailing plants like ivy or petunias for an unconventional planter wall.

Vertical Garden in a Laundry Baskets

When you need to fill a large space, repurpose a laundry basket by lining it with a garbage bag, adding soil, and planting your desired greenery.

Plant cascading plants like ferns or sweet potato vines in a laundry basket and hang it on a wall or fence for a vertical garden.

Herb Garden in a Wooden Crate

Utilize a wooden crate to organize different herbs with labels for easy identification.

Succulent Wreath: Design a unique succulent wreath by planting succulents in a wreath form and hanging it on a door or wall.

Hanging Basket in a Colander

Transform a colander into a hanging basket by drilling drainage holes, filling it with soil, and adding your chosen plants. Hang it with a hook or rope.

Benefits Beyond Aesthetics

Apart from the visual appeal, using creative and recycled pots in your garden offers several benefits:

Environmental Impact

By repurposing or recycling materials, you reduce the demand for new resources and minimize waste, contributing to a more sustainable planet.

Cost-Efficiency

Creative and recycled pots are often budget-friendly options, allowing you to beautify your garden without breaking the bank.

Unique Garden Aesthetics:

These pots add a personal touch to your garden, making it a reflection of your creativity and eco-consciousness.

Conversation Starters

Your garden can become a topic of conversation as visitors admire your innovative and sustainable gardening solutions.

Conclusion

In conclusion, creative and recycled pots are not just a trend but a sustainable way to infuse your garden with personality and purpose. As you embrace these eco-friendly gardening practices, you contribute to a greener future while enjoying the artistry and charm of your own green space. So, roll up your sleeves, get creative, and watch your garden flourish in the most delightful way possible.

Happy gardening!

Terrace Garden Triumph: Mastering the Art of Greenery with Diverse Plant Selection!

Introduction

Hey there, urban garden enthusiasts! If you’ve got a sunny terrace and a green thumb itching for action, you’re in for a treat. Terrace gardening has taken the urban landscape by storm, bringing a burst of life to concrete jungles. But the real magic lies in the variety of plants you can grow in these cozy, elevated spaces. In this article, we’ll explore the delightful world of terrace gardening, highlighting different types of plants that thrive in this environment. From vibrant flowers to fresh herbs and even small fruit trees, we’ve got your terrace covered with the ultimate plant palette.

1. Blooms of Joy: Ornamental Plants

First up, let’s talk aesthetics. If you want to transform your terrace into a picturesque oasis, ornamental plants are your best friends. Think marigolds, petunias, pensy, dahlia, zinnia, and begonias, which add a pop of color and charm to your outdoor space. These beauties thrive in pots or containers, making them ideal for compact terraces. Furthermore, they require minimal maintenance, so even those with limited gardening experience can enjoy their vibrant blooms throughout the seasons.

2. Green Freshness: Herbs

Who doesn’t love the idea of plucking fresh basil for a caprese salad or mint for a mojito right from your terrace? Herbs like basil, mint, rosemary, and thyme flourish in pots or hanging baskets. They’re not only practical but also add a delightful fragrance to your space. Moreover, growing herbs on your terrace can promote sustainable living by reducing the need for store-bought herbs that often come in plastic packaging, making it an eco-friendly choice. Additionally, having these herbs readily available can inspire your culinary adventures, elevating your cooking and giving your dishes that special, homegrown touch.

3. Leafy Delights: Leafy Greens

If you’re into salads or simply want to enjoy the satisfaction of growing your own food, leafy greens are the way to go. Spinach, lettuce, and kale are space-efficient and perfect for terrace gardening. Plus, they’re packed with nutrients and freshness. To make the most of your terrace space, consider using vertical planters or tiered containers to maximize your leafy green yield. Additionally, growing your own greens allows you to have a constant supply of organic, pesticide-free produce at your fingertips, promoting a healthier lifestyle while reducing your carbon footprint. Experiment with different varieties and enjoy the versatility of these greens in your daily meals.

4. Sweet Rewards: Small Fruit Trees

Dreaming of picking your own fruits without needing a sprawling orchard? Well, dwarf varieties of fruit trees like apple, lemon, and fig are terrace-friendly and produce a modest yield of scrumptious fruits. They’re a bit of a long-term investment, but the taste is oh-so-worth-it. Additionally, small fruit trees can serve as both decorative and functional elements on your terrace, providing shade, privacy, and beauty as they blossom and bear fruit. Moreover, they offer a unique opportunity to connect with nature and experience the joy of harvesting your very own tree-ripened fruits, making your terrace truly special.


Similar Posts


5. Tropical Vibes: Palms and Succulents

If you want to infuse a bit of tropical paradise into your city life, consider palm trees and succulents. These low-maintenance wonders thrive in the warm, sunny conditions often found on terraces, and their unique aesthetics can transport you to a beachy haven. Furthermore, palms like the majesty palm or areca palm not only provide an exotic flair but also act as natural air purifiers, enhancing the overall air quality on your terrace. Additionally, the diversity of succulent species available allows you to create stunning arrangements that require minimal watering, making them an excellent choice for busy urban dwellers seeking a touch of natural beauty in their daily lives.

6. Aromatic Bliss: Lavender and Jasmine

Want your terrace to be a fragrant escape? Lavender and jasmine are perfect choices. Their soothing scents can turn your small outdoor space into a mini spa retreat. Additionally, these aromatic plants have been known for their relaxation-inducing properties, making them ideal for creating a tranquil ambiance for meditation or simply unwinding after a long day. Incorporate them into your terrace design, and you’ll have a sensory oasis that enhances your well-being and offers a refreshing break from the hustle and bustle of daily life.

7. Vertical Greenery: Climbing Plants

Don’t forget the vertical space! Climbing plants like ivy, morning glory, nasturtium, english ivy, and money plants can transform your terrace into a lush, green haven. They also provide a natural privacy screen and shade. Moreover, vertical greenery can help reduce ambient temperatures on your terrace, making it a more comfortable place to spend time during the hot summer months. These climbing plants not only beautify your space but also contribute to a healthier microenvironment, promoting biodiversity by attracting beneficial insects and birds, thus adding to the overall vibrancy of your outdoor oasis.

Conclusion:

Remember, successful terrace gardening is all about understanding your space, its microclimate, and the specific needs of your chosen plants. Make sure you provide the right containers, well-draining soil, and ample sunlight. Regular watering and occasional fertilization are the keys to keeping your green buddies happy.

So, there you have it, fellow terrace gardeners! Whether you’re aiming for a picturesque paradise or a bountiful harvest, there’s a wide range of plants waiting to thrive on your terrace. Start planting, and watch your urban oasis grow and flourish.

Happy gardening!

Adenium Care Guide: Tips for Nurturing Healthy and Vibrant Desert Roses!

Introduction:

Adenium, commonly known as desert roses or mock azaleas, are fascinating and unique succulents that captivate the hearts of plant enthusiasts around the world. Originating from arid regions, these remarkable plants have adapted to thrive in harsh conditions. Whether you’re a seasoned plant lover or a beginner, this comprehensive Adenium care guide will provide you with valuable insights to help your desert rose to flourish.

1.Choosing the Right Location:

Selecting an appropriate location is the foundation of successful Adenium care. These sun-loving plants require ample sunlight to thrive. Opt for a spot where they can receive at least 6 to 8 hours of direct sunlight each day. A south or west-facing window or a well-lit balcony is ideal for providing the necessary sunlight.

2.Soil and Potting:

Well-draining soil is a must for Adeniums. A mixture of cactus or succulent potting mix combined with perlite or sand works well. Ensure the pot has proper drainage holes to prevent waterlogging, which can lead to root rot. Adeniums like to be a bit root-bound, so choose a pot that is slightly smaller than what you would typically use for a plant of its size. This encourages better flowering.

3.Watering Wisely:

Adeniums are adapted to surviving in arid conditions, so they are accustomed to infrequent but deep watering. In between watering sessions, let the soil to totally dry out completely. Root rot might result from the frequent practice of overwatering. During the active growing season (spring and summer), water once every 10-14 days, and reduce frequency during the dormant period (fall and winter).

4.Temperature and Humidity:

These desert plants thrive in warm temperatures. Aim for a range between 70°F to 90°F (21°C to 32°C) during the day and slightly cooler temperatures at night. Adeniums appreciate low humidity, so they are well-suited to dry indoor environments. Avoid placing them in areas with high humidity, as it can increase the risk of fungal issues.

5.Fertilization:

Feeding your Adenium is essential for robust growth and vibrant blooms. Use a balanced, diluted liquid fertilizer formulated for cacti and succulents. During the active growing season, fertilize every 4-6 weeks. Reduce or stop fertilizing during the dormant period to allow the plant to rest.


Similar Posts


6.Pruning and Shaping:

Pruning is crucial for maintaining an attractive shape and encouraging branching. Pinch off the tips of young stems to promote bushier growth. Remove any dead or yellowing leaves to prevent pests and diseases from taking hold.

7.Pests and Diseases:

Keeping an eye out for pests like aphids, mealybugs, and spider mites is vital. Regularly inspect your Adenium and treat any infestations promptly with insecticidal soap or neem oil. Proper care, including well-draining soil and appropriate watering, can help prevent root rot and fungal issues.

8.Propagation:

Adeniums can be propagated through seeds or stem cuttings. For stem cuttings, allow the cut end to dry and callous before planting in well-draining soil. Propagation is best done during the active growing season for higher success rates.

9.Repotting:

Adeniums generally don’t require frequent repotting. Repot only when the plant becomes severely root-bound or when you notice it’s struggling. Repotting is best done in the spring, before the active growing season. Repotting every 2-3 years or when the plant outgrows its container helps promote healthy growth.

10.Dormancy:

Adeniums naturally go through a period of dormancy, usually during the fall and winter. During this time, reduce watering and cease fertilization. Place the plant in a slightly cooler location, but protect it from frost.

Remember that adeniums might not bloom consistently throughout the year. Their blooming is influenced by factors like age, health, light, and temperature. With proper care and patience, you can encourage your adenium to produce beautiful blooms when its blooming season arrives.

Conclusion:

Adeniums are captivating and rewarding plants that can thrive with the right care and attention. By providing them with proper sunlight, well-draining soil, careful watering, and regular maintenance, you can enjoy a stunning display of their unique caudex and colorful blooms. Remember that each plant is unique, so observing your Adenium’s specific needs will ensure a thriving and beautiful desert rose in your collection.

Happy Gardening!