Growing and Maintaining Gerbera Plants: A Complete Guide to Vibrant Blooms!

Introduction:

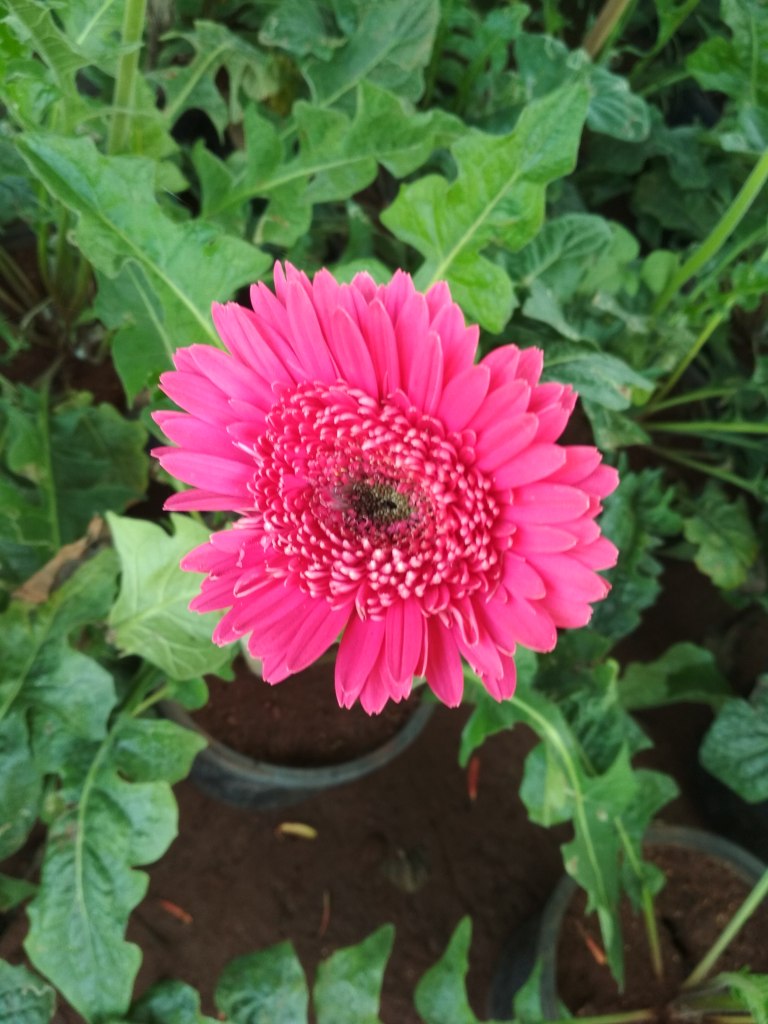
Gerbera plants, with their vibrant and colorful blooms, are a delightful addition to any garden or indoor space. Known for their daisy-like flowers and long-lasting blossoms, gerberas are relatively easy to grow with proper care and maintenance. In this comprehensive guide, we’ll explore everything you need to know about cultivating and nurturing gerbera plants for continuous and vibrant flowering.

Understanding Gerbera Plants:

Gerbera (Gerbera jamesonii) is a genus of ornamental plants native to South Africa, belonging to the Asteraceae family. These perennial flowering plants are cherished for their large, showy flowers, which come in a variety of colors, including red, yellow, orange, pink, and white. Gerberas thrive in moderate climates and are commonly grown as outdoor bedding plants, container plants, or cut flowers for floral arrangements.

Growing Conditions:

To ensure optimal growth and blooming, it’s essential to provide gerbera plants with the right growing conditions:

Sunlight: Gerberas prefer bright, indirect sunlight or partial shade. In hotter climates, they benefit from some protection from the intense afternoon sun to prevent scorching of the leaves and flowers.

Temperature: Gerberas thrive in moderate temperatures ranging from 65°F to 75°F (18°C to 24°C). Protect them from frost and extreme cold, as prolonged exposure can damage the foliage and flowers.

Soil: Well-draining, fertile soil with a slightly acidic to neutral pH (around 6.0 to 6.5) is ideal for gerbera plants. Add organic matter to your soil, such as compost or peat moss, to help with fertility and soil structure.

Watering: Make sure the soil is constantly damp but not soggy. Water gerberas thoroughly when the top inch of soil feels dry to the touch, and avoid overhead watering to prevent fungal diseases.

Planting and Propagation:

Gerberas can be propagated from seeds, division, or tissue culture. Here’s how to plant and propagate gerbera plants effectively:

Seed Propagation: Sow gerbera seeds in seed-starting trays filled with a well-draining potting mix. Keep the seeds moist and lightly cover with soil until germination takes place. Transplant the seedlings into individual pots once they develop true leaves.

Division: Mature gerbera plants can be divided during the dormant season or early spring. Carefully separate the clumps of rhizomes, ensuring each division has healthy roots and foliage. Plant the divisions in separate containers or directly in the garden bed.


Similar Posts:


Care and Maintenance:

Proper care and maintenance are essential for promoting healthy growth and continuous blooming of gerbera plants. Follow these tips to ensure your gerberas thrive:

Deadheading: Remove spent flowers regularly to encourage the production of new blooms and prevent the plant from diverting energy into seed production.

Fertilization: Feed gerbera plants with a balanced, water-soluble fertilizer every two to four weeks during the growing season. High-nitrogen fertilizers should be avoided as they may encourage the growth of foliage at the expense of flowers.

Pest and Disease Control: Monitor gerbera plants for common pests such as aphids, spider mites, and whiteflies. Use neem oil or insecticidal soap to quickly treat infestations. Furthermore, keep fungal diseases at bay by avoiding overhead watering and maintaining adequate air circulation.

Support: Tall varieties of gerbera plants may require staking or support to prevent the flower stems from bending or breaking. Use bamboo stakes or plant supports to provide structural support as needed.

Pruning and Deadheading:

Regular pruning and deadheading are essential for maintaining the health and appearance of gerbera plants. Follow these guidelines for pruning and deadheading gerberas:

Pruning: Remove any dead, damaged, or yellowing leaves and stems as needed throughout the growing season. To make precise cuts and stop spreading of diseases, use sharp, clean pruning shears.

Deadheading: Pinch or cut off spent flowers as soon as they fade to promote continuous blooming. Trim the flower stems back to the base of the plant or to a healthy set of leaves to encourage new flower buds to develop.

Conclusion:

Growing and maintaining gerbera plants can be a rewarding experience for gardeners of all skill levels. By providing the right growing conditions, proper care, and regular maintenance, you can enjoy a profusion of vibrant blooms throughout the growing season. Whether grown in garden beds, containers, or as cut flowers, gerberas add a splash of color and beauty to any landscape or indoor space. Incorporate these tips and techniques into your gardening routine to cultivate healthy, thriving gerbera plants and enjoy their stunning flowers year after year.

Happy Gardening!

Blooming Splendor: Mastering the Art of Growing and Caring Freesia Flowers!

Freesia is a beautiful flower native to South Africa, which blooms in bright colors and releases a delightful citrusy fragrance in late spring and early summer. Its upward-facing blossoms have a tubular shape, and each stem produces 5 to 10 flowers that grow on one side only. The double-flowered hybrids offer an even more stunning display. It’s worth mentioning that the stems turn at right angles just below the lowest flower, which causes the blossoms to face upwards and attract pollinators. This feature makes freesia an excellent choice for floral arrangements.

Table Of Contents

How to Select Freesia Bulbs

When selecting freesia bulbs, opt for firm, plump corms devoid of any soft spots or signs of mold. Look for larger corms as they tend to produce more robust blooms. Ensure they are free from blemishes or cuts, indicating potential damage or disease. Additionally, choose bulbs that feel heavy for their size, indicating good moisture content and vitality, ensuring a promising start to their growth journey.

Where to Plant Freesia

Freesia is a plant native to the hot and dry regions of South Africa and it thrives in similar environments when planted in the garden. It is best grown in hot and dry planting sites such as south-facing foundation gardens, curbside, and sidewalk gardens. Freesia needs cool nights to flower well, so it is important to ensure that it gets the required temperature.

To achieve the best visual effect, plant freesia in clusters of 6 to 10. You can plant them as groups of single colors or mix the colors to create a confetti effect.

How and When to Plant Freesia

If you live in zones 9 or 10, you can plant freesia corms in the fall and enjoy their colorful racemes of flowers in spring. Planting them after the last frost in spring will ensure they bloom in late summer or early fall in cooler zones. Make sure to plant the corms with their pointed ends up, 1 to 2 inches deep, and no more than 2 inches apart.

However, in zones 3 to 8, the tender corms won’t survive the winter. You’ll have to dig them up after they have bloomed and the foliage has shriveled up, but before the first frost. Store them in sand or coconut coir in a cool, dry place at around 55 degrees F until you’re ready to replant them in the spring.

Freesia Care Tips

Light

Freesia thrives in full sun, but can also tolerate light morning shade.

Soil and Water

Freesia thrives in soil that is well-drained, fertile and enriched with organic matter. When planting, avoid overwatering as it can cause the bulbs to rot. Once the bulbs start sprouting, water them regularly but moderately, especially in the absence of rainfall. During the hot summer months, freesia will go dormant and should not be watered until the next growing season.

Temperature and Humidity

Freesia plants are typically hardy in zones 9 and 10. However, if you are in zone 8 and below, their corms will not survive the winter chill, so they need to be grown as an annual. The best time to grow freesia is during cool springtime temperatures between 55 and 60 degrees. These plants can tolerate humid conditions, but they will stop blooming and go dormant if the temperatures rise above 70 degrees F.

Fertilizer

Once the young plants reach a height of 6 inches, start fertilizing them every two weeks with a liquid fertilizer as per the manufacturer’s instructions.

Pruning

Freesias do not require pruning. After blooming, it’s crucial to wait for the narrow, blade-like leaves to turn yellow, wilt, and shrivel completely before removing them. This is when the plant forms new bulblets.


Similar Posts


Potting and Repotting Freesia

Freesia is a beautiful flower that can be grown in containers or planted alongside other annuals and perennials that don’t need too much watering. To grow freesia in containers, start in early spring by filling a 5-inch-tall planting pot with a mixture of lightweight potting soil and compost that drains well. Plant 6 to 8 corms, with their pointed ends up, about 1 inch deep. This will give you a cluster of lush freesias in late summer or early fall. Another option for growing spring-blooming freesia in containers is to plant them in pots during the fall and keep them in a frost-free area where the temperature remains between 55 and 60 degrees Fahrenheit.

Pests and Problems

Insects such as aphids and thrips are attracted to freesia plants. Additionally, snails and slugs may also feed on them. Freesia plants are susceptible to various diseases, including root and stem rot, which develops in wet conditions, dry rot, and fusarium wilt, a type of fungus.

How to Propagate Freesia

Freesias can be best propagated from corms, which are bulb-tuberous underground stems. The size of the corms determines the energy they contain, and subsequently, the size of the flowers they produce. Therefore, when propagating freesias, it is recommended to choose only large and healthy corms.

To propagate the plant, gently remove the corm offsets from the parent plant, making sure that they are not damaged. When planting, keep the corms 2 inches apart or denser, following the instructions for planting freesias.

Note that when propagating freesia from corms, they may not bloom in the first season, unlike newly purchased corms.

Freesia Companion Plants

Freesia is a unique cutting flower that is not commonly grown in home gardens. It is quite expensive at florists, but planting your own freesia can be a great way to enjoy the beauty of a florist shop bouquet from your backyard. You can create a charming garden bouquet by pairing freesia with dahlias, gladiolus, lady’s mantle (Alchemilla mollis), larkspur, cosmos (Cosmos bipinnatus), amaranth, and pincushion flower (scabiosa). When creating a cutting garden, it is recommended to plant in rows for easy care and harvesting all season long. You can also add structure to the planting bed by surrounding it with a low fence.

Cutting and Arrangements of Freesia Flowers

Freesias are known for their elegant blooms and citrusy fragrance, making them a perfect choice for cut flowers that can enhance any floral arrangements with their charm. When harvesting, it is best to wait until the first few buds begin to open but are not fully bloomed yet. Cut the stems at an angle and preferably in the morning or late afternoon. After cutting, immediately place them in lukewarm water to prolong their vase life. To keep them fresh longer, trim the stems every few days under running water, and change the water regularly. Freesias blend beautifully with other garden favorites such as dahlias, gladiolus, and cosmos, adding depth and fragrance to bouquets. Their slender stems and captivating upward-facing flowers make them a favorite for artistic arrangements, ensuring a delightful fragrance graces your indoor spaces while displaying their aesthetic appeal.

Conclusion

Embracing vibrant hues and fragrant blooms, cultivating freesias can enrich outdoor spaces and offer delightful arrangements for indoor displays. These elegant flowers grow gracefully in containers and make stunning cut flowers that captivate with their beauty and charm. Growing, arranging, and savoring freesias can infuse any space with a touch of floral elegance and a citrusy fragrance.

Happy Gardening!

Blooming Brilliance: A Comprehensive Guide to Growing Crossandra Flowers in Your Garden!

Introduction

Crossandra flowers, also known as firecracker flowers or Crossandra infundibuliformis, are tropical delights that can bring vibrant splashes of color to your garden. Known for their striking blooms and easy maintenance, cultivating Crossandras can add an exotic touch to your outdoor space. Here’s a detailed guide to growing these stunning flowers in your garden.

1. Choosing the Right Location:

Select a spot in your garden that receives partial shade to full sun, providing adequate warmth and sunlight for Crossandra growth. Ensure the area has well-draining soil, as these flowers thrive in moist but not waterlogged conditions.

2. Planting Crossandra Flowers:

Crossandras can be grown from cuttings or from seeds or you can buy a rooted plant from nursery. When planting Crossandras, space them out accordingly, allowing enough room for growth. Dig a hole slightly larger than the root ball, gently place the plant, and cover the roots with soil. After planting, it is important to water the area thoroughly to help the roots establish properly.

3. Soil and Watering Needs:

Crossandra plants prefer slightly acidic to neutral soil. Regular watering is essential, especially during dry spells, but be cautious not to overwater as it can lead to root rot. Mulching is an effective way to trap moisture in soil and keep soil temperature stable.

4. Fertilization and Maintenance:

Use a balanced fertilizer or one specifically formulated for flowering plants during the growing season to encourage robust blooms. Prune the plants after flowering to maintain their shape and remove any dead or damaged growth.

5. Protecting from Pests and Diseases:

Monitor for common pests like aphids or whiteflies and treat them promptly to prevent infestations. Crossandras are generally resilient but keeping an eye out for signs of diseases such as root rot or fungal infections is crucial for their health.

6. Propagation and Division:

You can propagate Crossandras by taking stem cuttings or dividing mature plants. Root the cuttings in a well-draining potting mix and keep them in a warm, humid environment until they develop roots. While planting cuttings, ensure that at least two nodes of the plants are properly covered with soil, as the roots develop from these nodes. You can also keep the mature cuttings in water for a few days to allow the roots to grow before planting them in soil.

7. Enjoying the Blooms:

With proper care, Crossandra plants will reward you with stunning clusters of fiery-colored flowers throughout the growing season. These blooms not only add visual appeal but also attract pollinators like butterflies and bees to your garden.

8. Winter Care:

In colder climates, consider bringing potted Crossandras indoors during winter or providing a protective covering for outdoor plants to shield them from frost damage.


Similar Posts


Benefits Of Growing Crossandra

Crossandra are tropical wonders with multifaceted importance. Their significance transcends horticulture, culture, and traditional medicine, making them intriguing plants worth exploring.Here are some benefits of growing crossandra.

1. Ornamental Marvels:

Renowned for their vibrant hues of red, orange, and yellow, Crossandras are prized for their striking flowers. They’re coveted additions to landscapes and potted arrangements, elevating gardens and indoor spaces with their vivid beauty.

2. Cultural and Religious Ties:

In various cultures, Crossandras are entwined with rituals and ceremonies. For instance, they hold significance in Hindu religious practices and are offered in worship to deities.

3. Medicinal Properties:

Certain parts of the Crossandra plant, notably the leaves, have been historically used in traditional medicine. They’re believed to possess medicinal properties, aiding in treating skin disorders and digestive issues.

4. Pollinator Magnets:

These flowers act as nectar sources, drawing in vital pollinators like butterflies and bees. Their role in plant pollination supports the health of ecosystems.

5. Landscape Versatility:

Valued for their resilience in diverse climates, Crossandras are favored in landscape design. They’re utilized to craft vibrant, low-maintenance garden beds and borders.

6. Symbolic Significance:

Crossandras are often associated with traits like warmth, vibrancy, and passion due to their fiery blooms. This symbolism makes them ideal for expressing specific emotions in floral arrangements.

7. Botanical Intrigue:

Of botanical interest, Crossandras captivate scientists for their unique flower structure and classification within the Acanthaceae family. Their genetic diversity and adaptability to different environments make them subjects of scientific study.

Crossandra flowers are a tapestry of cultural, medicinal, and horticultural significance. Their diverse roles in various contexts showcase their multifaceted nature, making them fascinating subjects that weave through the realms of art, tradition, and science.

Conclusion

Growing Crossandra flowers can be a rewarding experience, adding tropical allure and vibrant colors to your garden. With the right care and attention, these resilient plants can thrive, bringing joy and beauty to your outdoor space throughout the year.

Happy Gardening!