Blooms of Elegance: A Comprehensive Guide to Growing and Caring for Camellia Plants!

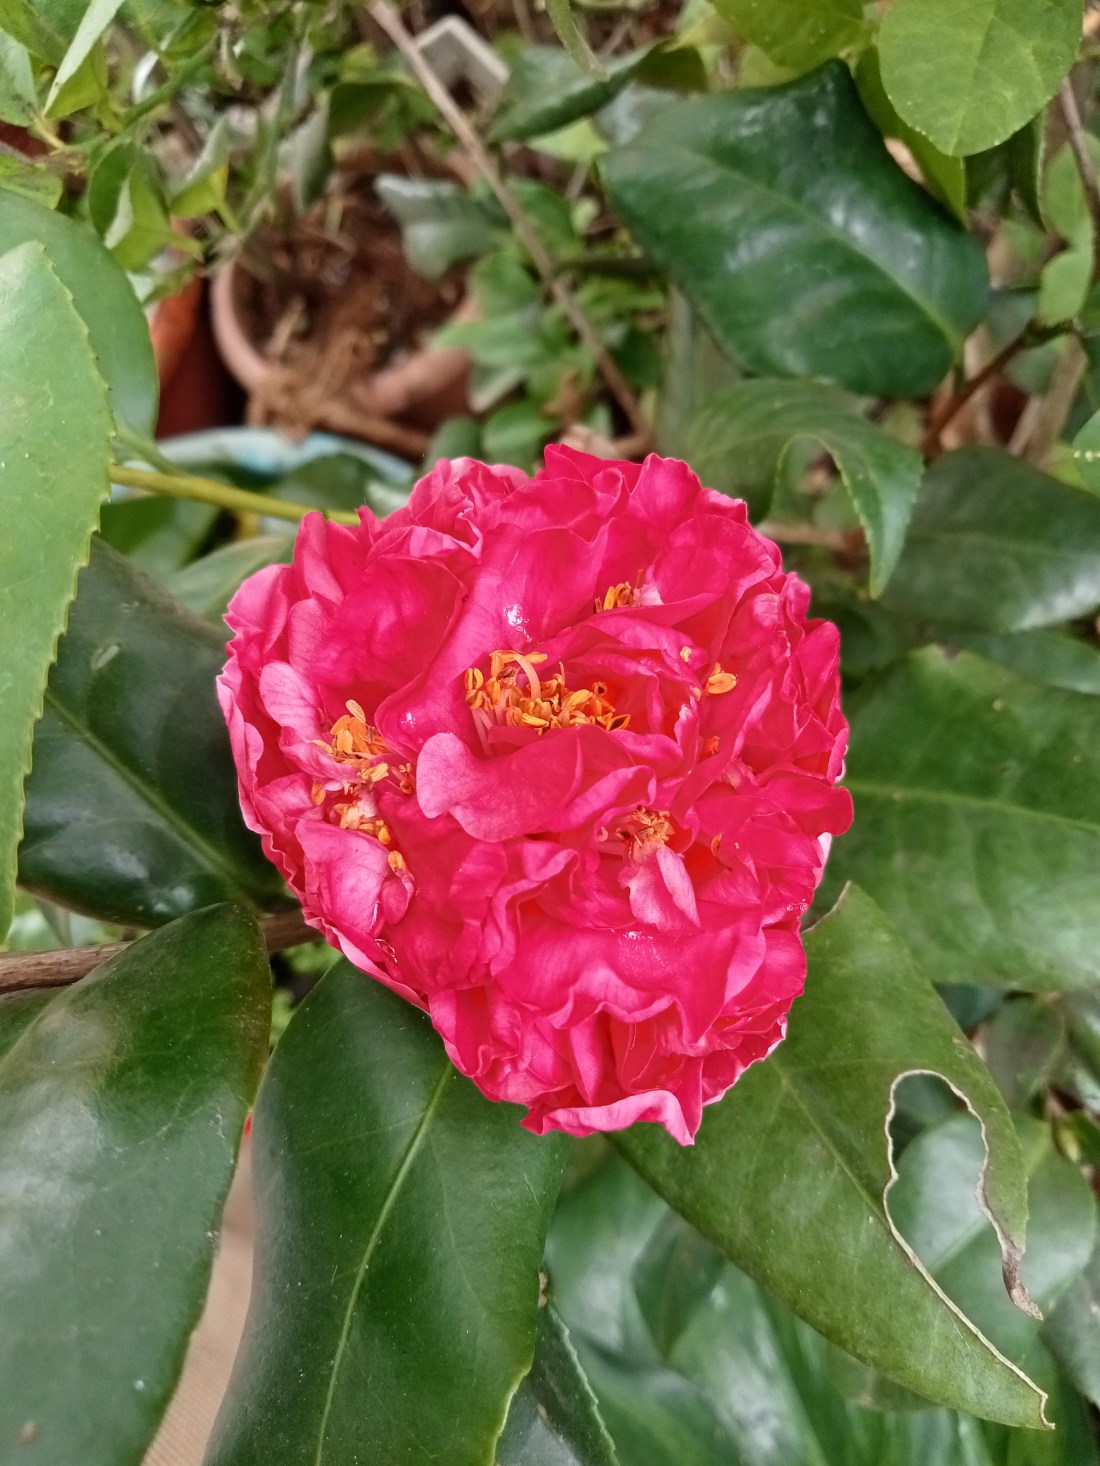
Camellias are cherished for their elegant blooms, glossy foliage, and evergreen charm, making them prized additions to gardens around the world. Known for their exquisite flowers that appear in various colors and forms, camellias add a touch of beauty and sophistication to landscapes. Whether you’re a novice gardener or a seasoned enthusiast, learning how to grow and care for camellia plants can elevate your gardening experience and ensure the health and vitality of these beloved ornamentals.

Introduction to Camellias:

Camellias belong to the genus Camellia, which comprises over 300 species, with Camellia japonica and Camellia sasanqua being among the most popular cultivated varieties. Originating from Asia, particularly China and Japan, camellias have been cultivated for centuries for their ornamental value and cultural significance. These evergreen shrubs or small trees are prized for their lush foliage and stunning flowers, which bloom in late fall, winter, or early spring, depending on the species and variety.

Growing Camellias:

Growing camellias begins with selecting the right location and providing optimal growing conditions for these ornamental beauties. Here’s a step-by-step guide to cultivating camellias in your garden:

Choose the Right Location: Camellias thrive in partially shaded to shaded areas with protection from the hot afternoon sun. Select a site with well-draining, acidic soil rich in organic matter.

Planting: Plant camellias in the fall or early spring when the soil is moist and temperatures are mild. Make a hole that is two times as deep and wide as the root ball. Make sure the top of the root ball of the plant is level with the soil surface when you place it in the hole. Backfill the hole entirely with water and soil.

Watering: Consistently keep the soil moist but not waterlogged, water deeply and regularly, and avoid overhead watering to prevent fungal diseases.

Fertilizing: Feed camellias with a balanced, slow-release fertilizer formulated for acid-loving plants in early spring before new growth emerges. Repeat fertilization in late spring or early summer if necessary. Avoid using high-nitrogen fertilizers as they may lead to more foliage growth and less flowering.

Mulching: Apply a layer of organic mulch, such as pine straw or shredded bark, around the base of the plant to conserve moisture, suppress weeds, and regulate soil temperature. Maintain a mulch depth of 2-3 inches, keeping it away from the trunk to prevent rot.

Pruning: Prune camellias selectively to maintain their desired shape, remove dead or diseased branches, and promote air circulation within the canopy. Pruning is best done after flowering to avoid cutting off potential buds.


Similar Posts


Caring for Camellias:

Caring for camellias involves regular maintenance practices to ensure their health, vigor, and prolific blooming. Here are some essential care tips for camellia plants:

Pest and Disease Control: Monitor camellias regularly for signs of pests, such as aphids, scale insects, and spider mites, as well as diseases like camellia leaf spot and root rot. Treat infestations promptly with horticultural oil, insecticidal soap, or neem oil, and remove infected plant parts to prevent the spread of disease.

Winter Protection: In colder climates, provide winter protection for camellias by covering them with frost cloth or burlap during freezing temperatures. Mulch around the base of the plant to insulate the roots and minimize frost damage.

Deadheading: Remove spent flowers promptly to encourage continuous blooming and prevent seed production, which can divert energy away from flower production.

Container Care: If growing camellias in containers, choose a large, well-draining pot and use a soil mix formulated for acid-loving plants. Water container-grown camellias regularly to keep the soil evenly moist, and fertilize them according to label instructions.

Hydration: During periods of drought or high temperatures, provide supplemental irrigation to ensure camellias receive adequate moisture. It is important to avoid overwatering your plants, as damp soil can cause root rot and other issues.

Monitoring pH Levels: Regularly test the soil pH around camellias to ensure it remains acidic, ideally between 5.0 and 6.5. Amend the soil with sulfur or acidic fertilizers if necessary to maintain optimal pH levels.

Conclusion:

Growing and caring for camellias can be a rewarding experience, offering gardeners a glimpse of nature’s beauty and resilience. By providing the right growing conditions, proper maintenance, and tender loving care, you can enjoy the bountiful blooms and lush foliage of these exquisite plants year after year. Whether adorning garden beds, borders, or containers, camellias are sure to captivate with their timeless elegance and charm.

Happy Gardening!

Maximizing Rain Lily Blooms: The Importance of Repotting and Care!

Introduction:

Repotting plays a crucial role in the growth and blooming of rain lilies, ensuring they receive the necessary nutrients and space to thrive. By following specific guidelines and care routines, gardeners can enhance the beauty of these delicate flowers and enjoy vibrant blooms year after year.

Importance of Repotting:

Enhancing Growth and Bloom Potential: Nitrogen is essential for plant growth, making repotting a vital task to replenish soil nutrients and provide adequate space for rain lilies to flourish. It is imperative to ensure that the soil is well-aerated and nutrient-rich to support the rain lilies’ growth and blooming cycle. To achieve optimal blooming, adhering to certain rules during the repotting process is essential.

Propagation and Expansion: Repotting presents an opportunity not only to rejuvenate existing rain lilies but also to propagate and expand your collection. As bulbs multiply over time, consider dividing them during repotting to create new plants.


Similar Posts


How to Repot Rain Lilies:

Repotting rain lilies requires attention to detail and a systematic approach to ensure the best results. Here’s a step-by-step guide to repotting rain lilies effectively:

Removing Bulbs:

Carefully turn the pot upside down to remove the bulbs. Trim any excess roots and leaves, preparing them for transplantation into fresh soil.

Soil Mix:

Prepare a suitable soil mix consisting of 50% normal soil, 30% vermicompost, and 20% cocopeat. Avoid using chemical fertilizers during planting. After preparing the soil with fertilizer, it is recommended to dip the plants in a fungicide solution before planting them.

Pot Size:

Select pots with diameters ranging from 8 to 10 inches, ensuring adequate space for 3 to 4 rain lily bulbs per pot. Proper spacing between bulbs is crucial to prevent overcrowding and promote healthy growth and blooming.

Pot Placement:

After repotting, place the pots in a shaded area for the first two days to allow the plants to acclimate. Once the leaves begin to grow, gradually shift the pots to a sunnier location to facilitate optimal blooming.

Fertilizer:

While chemical fertilizers can be introduced one month after planting, consider using organic alternatives such as vermicompost for chemical-free gardening. Additionally, Tata Raligold Spray can be applied at least once a month to promote root formation and enhance blooming potential.

Monitoring and Maintenance:

After repotting, it’s crucial to monitor the health and growth of rain lilies regularly. Keep an eye on soil moisture levels, ensuring it remains consistently moist but not waterlogged. Adjust watering frequency based on environmental conditions and plant needs, especially during periods of intense heat or rainfall. Additionally, inspect the foliage for signs of pests or diseases, addressing any issues promptly to prevent spread and damage to the plants.

Conclusion:

Repotting is a fundamental aspect of rain lily care, ensuring they receive the nutrients, space, and attention necessary for robust growth and blooming. By following proper repotting techniques and adhering to essential care guidelines, gardeners can maximize the blooming potential of rain lilies. With attention to detail and a commitment to organic gardening practices, beautiful blooms can adorn gardens year after year, bringing joy and color to outdoor spaces.

Happy Gardening!

Finding Green Bliss: Buying and Swapping Plants on Facebook

Introduction

In the age of e-commerce, there’s something uniquely satisfying about sourcing your beloved plants and gardening essentials through vibrant Facebook communities. Whether you’re a seasoned gardener or just starting your green journey, these thriving online plant groups offer a treasure trove of botanical delights, cost-effective options, and expert advice. Let’s dive into the world of Facebook plant groups and discover why they’re becoming the preferred choice for plant enthusiasts.

The Green Advantage of Facebook Plant Groups

Why limit yourself to conventional online plant shopping when you can join a thriving community of fellow plant lovers? Here’s why Facebook plant groups have become the go-to platform for buying, swapping, and enriching your plant collection:

1. Budget-Friendly Finds

One of the most compelling reasons to explore Facebook plant groups is the opportunity to unearth incredible plants at wallet-friendly prices. Many sellers offer top-quality plants at a fraction of the cost you might find on commercial websites.

2. Diverse Plant Categories

Facebook plant groups cater to every botanical passion. Whether you’re obsessed with orchids, adore adeniums, fancy water lilies, or are enchanted by succulents, you’ll find specialized groups dedicated to your favorite plant varieties.

3. Comprehensive Shopping

It’s not just about buying plants; Facebook plant groups also provide access to essential gardening supplies like fertilizer and potting mix. With all your gardening needs in one place, you can nurture your green space with ease.

4. Expert Insights

Within these groups, you’re not just purchasing plants; you’re gaining valuable insights. Members willingly share their gardening wisdom, offering tips and tricks for nurturing your plants to perfection.


Similar Posts


Navigating the Green Marketplace: Tips for Safe Shopping

While Facebook plant groups offer a delightful plant-buying experience, it’s important to exercise caution to avoid potential pitfalls. Here are some essential tips for safe and satisfying plant shopping:

1. Profile Scrutiny

Before making a purchase, thoroughly research the seller’s profile. A well-established and active profile is often a reassuring sign of a reliable seller.

2. Avoid Locked Profiles

If a seller’s profile is locked, think twice before proceeding with the purchase. When it comes to online transactions, transparency is essential.

3. Check for Reviews

Review the seller’s reputation within the group. If there are negative reviews or complaints, it’s best to steer clear.

4. Seek Guidance

Don’t hesitate to seek guidance from group administrators and members. They can provide valuable advice and recommendations based on their experiences.

Facebook Groups for Your Green Quest

To kickstart your plant-buying adventure, here are some popular Facebook plant groups that you can explore:

Buying and Selling Plants Groups

Seed and Plants Swap Groups

Epiphyllum Plant Groups

Hibiscus Groups

Adenium Groups

Orchid Groups

Aquatic Plants Groups

Succulent And Cactus Groups

Rain Lily Group

Plant Care and Tips

Other Plant Groups

Joining these groups opens the door to a world of green possibilities. From rare finds to trusted advice, you’ll discover a vibrant community of plant enthusiasts eager to share their love for all things botanical.

In conclusion, Facebook plant groups offer a delightful alternative to traditional online plant shopping. They foster a sense of community, promote budget-friendly gardening, and provide a platform to explore your botanical passions. So, why wait? Dive into these green havens, and let your plant collection flourish!

Happy gardening!

Choosing the Perfect Tulips for Your Garden!

Introduction

Tulips, with their vibrant colors and elegant structure, are a delightful addition to any garden. While their beauty is undeniable, choosing the right tulips and understanding how to care for them is crucial for a flourishing display. From selecting the varieties to nurturing them through seasons, here’s a comprehensive guide to help you pick and cultivate the perfect tulips for your landscape.

Understanding Varieties: Hybrid vs. Species Tulips

The tulips you commonly encounter, often found in garden centers, are hybrid tulips. They offer stunning displays but typically need annual replacement for optimal results. On the other hand, species tulips, hardy in zones 4 to 7, possess perennial characteristics, returning year after year given the right conditions. These shorter tulips boast smaller flowers with distinct, pointed petals.

Blooming Time Matters

Tulips have varying flowering durations, with early, mid, and late-season varieties. To ensure an extended and continuous bloom, opt for a mix of tulips from each category when making your selections. This thoughtful curation guarantees a prolonged and captivating showcase in your garden.

Planting Essentials: Location, Timing, and Soil

Tulips thrive in full sun, requiring at least six hours of direct sunlight daily. They also favor well-draining soil, making them ideal for rock gardens. Planting occurs in the fall, with timing dependent on your climate zone. Ensure the soil has cooled from the summer heat before planting. If your area doesn’t experience adequate chilling temperatures, consider pre-cooled bulbs for successful growth.

Soil Preparation and Planting Technique

Prepare the planting area by incorporating nutrient-rich soil (Soil: Vermicompost: Cocopeat). Mixing this soil with the native one promotes robust root development, essential for a splendid spring bloom. When planting, group tulips in sets of ten or more, burying each bulb eight inches deep with the pointy end facing upwards. Optimal spacing allows for a captivating display. Thorough watering after planting is crucial for initial growth.


Similar Posts


Potted Tulip Care

Growing tulips in containers is effortless. Plant bulbs at a depth of eight inches, and ensure the container is moved to a cool, dry location before the first frost. When outdoor growth begins, relocate the pot to a sunny spot and maintain regular watering.

Watering and Feeding

Water tulips upon planting and then weekly for the first month. Resume watering in spring when foliage emerges. Feeding post-flowering with plant food supports nutrient storage for the next season. Apply this feed again in late fall before dormancy.

Maximizing Indoor Enjoyment

To enjoy tulips indoors, cut them when the buds are tight and place them in room-temperature water in a clean vase. Adding preservatives to the water extends their lifespan, and trimming the stems periodically maintains their elegance.

Post-Blooming Care

For species of tulips to return annually, trim the flower stalks once blooms fade. Feed the bulbs, stop watering during dormancy, and trim foliage after it browns. Hybrid varieties are not perennial; remove and compost their bulbs after flowering.

Protecting Against Pests

Deer and rodents can pose a threat to tulips. Use chicken wire to protect bulbs from being dug up, and consider interplanting with deer-resistant varieties like daffodils or Crown Imperials. Utilize deer repellents for additional protection.

Conclusion

Embark on your tulip-growing journey armed with these insights! By selecting the right varieties, providing optimal care, and safeguarding against pests, you’ll create a stunning tulip display that enchants year after year. Whether in garden beds or charming pots, these tips ensure a flourishing and vibrant floral showcase.

Happy Gardening!

Cultivating Hyacinths: Your Comprehensive Growing Guide!

Introduction

Hyacinths, renowned spring blooms akin to tulips and daffodils, emerge with striking spikes of vivid colors—blues, purples, whites, pinks, apricots, and reds, precisely when winter wanes and you yearn for blossoms. Unlike their counterparts, these fragrant beauties sustain their captivating blooms for an impressive two weeks or more, adding allure to the onset of spring.

For those seeking versatility, hyacinths shine not only in garden beds but also as cut flowers, adorning indoor vases and spaces with their captivating allure. Their long-lasting blooms and fragrant presence make them a perfect choice for stunning floral arrangements that infuse homes with a touch of elegance and natural beauty.

Origins and Popularity of Hyacinths

Originating from Turkey, Syria, and Lebanon, hyacinths found their way to Europe during the 16th century and swiftly rose to prominence. The Dutch, revered for their love of bulbous flowers, had developed over 2,000 cultivars by the 18th century, emphasizing the popularity and significance of these enchanting flowers.

Planting Hyacinths: The Right Start Matters

The ideal time for planting hyacinth bulbs is late summer to early fall, ensuring they establish themselves before frost sets in. Select a spot basking in at least four hours of sunlight daily, favoring locations with full to partial sun exposure.

Ensuring loose and loamy soil is crucial, as hyacinths tend to suffer in heavy, moisture-retentive soils. Enhance soil drainage by incorporating compost, shredded pine bark, or aged manure. For heavy clay soil, raised beds offer an effective solution to improve drainage.

Mass planting hyacinth bulbs, at least 4 inches deep and 3 inches apart, intensifies their sweet fragrance and visual impact. Grape hyacinth bulbs, however, should be planted shallower, at 2 to 3 inches deep.


Similar Posts


Essential Care Tips for Thriving Hyacinths

Adequate moisture without overwatering is vital. During dry spells, ensure they receive about an inch of water weekly. Fertilize with bulb food during the spring emergence and again in early fall for optimal growth.

Post-bloom, supplement the soil with compost to provide essential nutrients for the next season’s blossoms. For enhanced vitality, allow the foliage to persist for six weeks after flowering, as these leaves serve as nutrient factories for future blooms.

For areas lacking cold winters, a special regimen involving digging up bulbs after spring foliage dies, storing them in a cool, dry place, and refrigerating for a couple of months before replanting in fall ensures their continued bloom.

Forcing Hyacinths: Indoor Bloom Marvels

To usher in a fragrant indoor bloom during winter, forcing hyacinth bulbs can work wonders. With or without soil, these methods yield delightful indoor blooms:

With Soil: Plant bulbs slightly exposed in pots, then refrigerate for at least 10 weeks. Gradually introduce them to sunlight for a stunning indoor display.

Without Soil: Employ a bulb-forcing vase, suspending pre-chilled bulbs above water. Place in a well-lit spot, changing water every two weeks, and watch them grow into charming blooms.

Dealing with Pests and Diseases

Hyacinths might face challenges like gray mold caused by excess moisture and bulb rot from overwatering. Identifying and addressing these issues promptly through appropriate measures like fungicide application or improved drainage is essential for their health.

Recommended Hyacinth Varieties

Explore an array of mesmerizing hyacinth varieties like ‘Carnegie,’ ‘China Pink,’ ‘Hollyhock,’ ‘City of Haarlem,’ ‘Peter Stuyvesant,’ ‘Gypsy Queen,’ ‘Viper Bow,’ ‘Woodstock,’ and more, each boasting unique colors and characteristics to grace your garden with splendid blooms.

Hyacinths, with their captivating hues and enduring fragrance, offer an extraordinary springtime spectacle. Their resilience and enchanting charm make them a garden favorite, enriching landscapes with vibrant colors and delightful scents. Embrace the allure of hyacinths and witness the beauty they bring to your garden.

Happy Gardening!

Your Complete Handbook to Cultivating Daffodils!

Introduction

Daffodils, also referred to as Narcissus, are resilient flowering plants that grace gardens with their captivating blooms. These stunning flowers, primarily yellow but also available in white or blends, brighten up the spring landscape, offering a vibrant array of colors ranging from bright yellow to soft pinks and salmons. Their unique characteristics, delightful fragrance, and adaptability make them ideal for container gardening, balconies, and traditional garden beds.

Understanding Daffodils

Daffodils showcase six flower leaves, with sepals on the exterior and actual petals within. These blossoms can appear solitary or double, growing individually or in clusters on a stalk, varying in height from 6 to 20 inches. The sweet aroma emitted by daffodil blooms contributes to their widespread popularity among gardeners.

Selecting the Right Daffodil Varieties

Before embarking on your daffodil journey, consider the variety that suits your preferences. Compact types like ‘Tete-a-Tete’ thrive exceptionally well in containers, providing an enchanting touch to smaller gardening spaces.


Similar Posts


Steps for Planting and Nurturing Daffodils

Planting:

Planting daffodils is a straightforward process. These hardy plants thrive in a wide range of light conditions, from full sun to full shade, adapting well to various soil types, particularly loose and well-drained soil. Enhance the soil’s drainage in denser soils by incorporating ample organic matter before planting.

Care:

Post-planting, ensure adequate moisture until foliage turns yellow, especially in dry weather. During summer, daffodils typically do not require additional watering. After flowering, maintain foliage for at least 6 weeks for healthier bulbs and a tidier appearance in the garden.

Container Planting:

Opting for containers? Choose those with adequate drainage and sufficient depth for bulb growth. Leave a gap between the bulb and pot rim, using a well-draining potting mix enriched with fertilizer. Monitor the bulbs for top growth, usually visible after six to eight weeks, while providing them with cool temperatures they prefer.

Maintaining Daffodils:

In case of underperforming bulbs, consider using low-nitrogen, high-potash fertilizers post-flowering. Ensure watering for late-flowering daffodils in dry spring weather to prevent flower abortion. Additionally, lifting and dividing congested clumps can stimulate healthier growth.

Positioning Containers:

Proper container placement is crucial for daffodil health. Balancing light and temperature to prevent rapid development resulting in floppy shoots is key. ‘Daffodil blindness,’ where leaves grow without flowering, can be addressed by relocating bulbs to a more prominent location once they begin blooming.

Extending the Beauty of Daffodils

As daffodils fade after their blooming period, consider deadheading spent flowers to promote energy conservation within the bulb for the following season’s growth. Allow the foliage to wither naturally, aiding the bulb’s nutrient replenishment process. To support next year’s blooms, consider adding bone meal to the soil after the daffodils have fully faded, ensuring a spectacular floral display year after year.

Embracing Daffodil Magic

Incorporating daffodils into your gardening repertoire brings forth not just vibrant colors but also an enduring sense of joy and natural beauty. Their resilience, coupled with their effortless charm, makes them a perennial favorite among gardeners worldwide. As you delve into the art of daffodil cultivation, revel in the magic they bring to your garden and the promise of spring they herald.

By adhering to these comprehensive steps and care instructions, you’ll ensure the continuity of daffodil cheer in your garden. So, embrace the joy of gardening and witness the beauty of daffodils as they bloom!

Happy Gardening!

Creating and Sustaining a Flourishing Kitchen Garden!

Introduction

Planning a kitchen garden is more than just choosing your favorite herbs or vegetables; it’s a blueprint for sustainable, homegrown produce. Here’s a comprehensive guide on how to craft and maintain a thriving kitchen garden.

Choose Your Plot:

Begin by selecting the ideal location for your kitchen garden. Pick a spot that receives ample sunlight and has good drainage. If space is limited, consider container gardening or vertical setups.

Select Your Plants Wisely:

Assess your culinary preferences and climate conditions before choosing the plants. Opt for a mix of vegetables, herbs, and fruits that thrive in your region and suit your cooking needs.

The ideal plants for a kitchen garden are those that not only fit your culinary preferences but also thrive in your local climate. Here are some popular choices:

  • Herbs: Herbs like basil, parsley, cilantro, thyme, rosemary, and mint are kitchen staples. They’re versatile, require minimal space, and can flourish in pots or directly in the ground.
  • Leafy Greens: Lettuce, spinach, kale, and Swiss chard are fast-growing leafy greens perfect for salads and smoothies. They’re relatively easy to grow and provide a continuous harvest.
  • Tomatoes: A favorite among gardeners, tomatoes come in various sizes and colors. They need ample sunlight and support for their vines but reward with abundant fruits.
  • Peppers: Bell peppers, chili peppers, and sweet peppers add zest to meals. They grow well in warm climates and containers, providing a vibrant splash of color to your garden.
  • Cucumbers: These vine-growing vegetables thrive in warm weather and offer a bounty of fresh, crisp cucumbers for salads and pickling.
  • Carrots and Radishes: Root vegetables like carrots and radishes are easy to grow and do well in loose, well-drained soil. They’re perfect for beginners due to their low maintenance.
  • Green Onions: These versatile onions are easy to grow from scraps and are a constant source of fresh flavors for various dishes.
  • Strawberries: Compact and versatile, strawberries can be grown in containers or hanging baskets, providing a sweet, juicy treat during the growing season.
  • Bush Beans: Beans are prolific growers and offer a harvest in a relatively short time. Bush beans, like green beans or snap beans, don’t require trellises and can be grown in limited space.
  • Zucchini and Squash: These prolific growers are perfect for larger spaces. They produce abundant fruits that can be used in various dishes.

Choose plants that suit your taste, available space, and local climate conditions for a successful and bountiful kitchen garden.


Similar Posts


Design and Layout:

Plan the layout of your garden, considering the growth patterns and space requirements of each plant.

  • Companion Planting: Pair plants that benefit each other when grown nearby which can maximize space and yield. For instance, planting basil near tomatoes can deter pests and improve the flavor of tomatoes.
  • Succession Planting: Plan your garden to ensure continuous harvests. As one crop finishes, replant that space with another crop suitable for the upcoming season.
  • Vertical Gardening: Utilize vertical space by growing climbers like peas, beans, or cucumbers on trellises or vertical supports. This maximizes space and promotes healthier plants.

Prepare the Soil:

Well-draining, nutrient-rich soil is the backbone of a successful kitchen garden. Invest time in preparing the soil by adding compost or organic matter to boost fertility.

Planting Techniques:

Follow planting guidelines specific to each crop. Some plants prefer direct sowing while others thrive better as seedlings. Pay attention to spacing and depth requirements.

Watering and Maintenance:

Regular watering is crucial, especially during the initial growth phase. Mulching helps retain moisture and suppresses weeds. Prune, weed, and monitor for pests to ensure healthy growth.

Harvest and Rotate:

Harvest crops at their peak to enjoy the freshest produce. Rotate crops annually to prevent nutrient depletion and minimize pest problems.

Seasonal Considerations:

Adjust your garden according to seasonal changes. Plant cool-season crops in spring and fall, and warm-season crops during the summer. Consider coverings or cold frames to extend the growing season.

Compost and Sustainability:

Implement composting to recycle kitchen scraps and garden waste. This sustainable approach enriches the soil and reduces waste, promoting eco-friendly gardening practices.

Continuous Learning:

Gardening is a continuous learning process. Stay updated on best practices, watch for plant-specific issues, and be open to adapting and improving your gardening methods.

By meticulously planning and nurturing your kitchen garden, you’re not only cultivating fresh produce but also fostering a deeper connection with nature and a sustainable way of living.

 Happy gardening!

Crafting and Sustaining Stunning Ponds and Water Features in Your Garden!

Introduction

Introducing ponds and water features into your garden elevates its charm, creating serene, nature-inspired spaces. From initial construction to ongoing maintenance, here’s a comprehensive guide to building and preserving these aquatic delights.

Designing Your Water Haven

Constructing a water feature commences with thoughtful planning. Assess your garden’s layout, determining the ideal location and size for the pond or water element. Factor in sunlight exposure, proximity to utilities, and accessibility for maintenance.

Building a Serene Oasis

Excavation marks the inception of your water feature. Dig the desired pond shape, ensuring varied depths for aquatic flora and fauna. Install a sturdy liner to retain water, and incorporate filtration systems or pumps for circulation and cleanliness.

Aquatic Plant Selection and Arrangement

Select aquatic plants suiting your water feature’s depth and purpose. Include oxygenators, floaters, and marginal plants to enhance biodiversity and oxygenate the water. Arrange them strategically, ensuring harmony between aesthetics and functionality.

If your pond receives ample sunlight, it’s recommended to plant some floating aquatic plants to prevent the growth of algae. Alternatively, you can plant water lilies and lotuses, which will not only add to the aesthetics of your pond but also help control algae growth. Incorporating aquatic plants like water lilies or lotuses adds vibrant colors and texture to your pond while offering shade and shelter for aquatic life. On the other hand, if your pond is located in a shady area or receives partial sunlight, it is advisable to go for non-flowering plants such as American eelgrass, parrot feather watermilfoil, water lettuce, etc. These plants will thrive in low-light conditions and will still be able to provide the necessary oxygen and nutrients to your pond.

Accentuating with Features and Décor

Enhance your water feature with embellishments like rocks, stones, or driftwood, mimicking natural water environments. Integrate waterfalls, fountains, or cascades to introduce soothing sounds and elevate visual appeal.

Consider installing lighting around the water feature to create stunning visual effects during evenings, transforming your garden into a magical oasis. Lastly, introduce seating areas or cozy corners near the water feature, inviting moments of relaxation and contemplation amidst the tranquil ambiance.


Similar Posts


Sustaining Water Quality and Health

Regular maintenance preserves the ecosystem’s equilibrium. Monitor water quality parameters, perform occasional cleanings, and tend to plant growth to sustain a balanced and thriving aquatic environment.

Consider installing a filtration system to sustain a healthy aquatic environment. Use fish such as guppies and mollies to control mosquito larvae. For larger ponds, consider introducing a small tortoise.

Winter Preparation and Seasonal Care

Shield your water feature from harsh winter conditions by installing heaters or ensuring adequate depth to prevent freezing. Adjust maintenance routines according to seasonal shifts, supporting plant health and preserving water quality year-round.

Safety and Considerations

Implement safety measures, especially if you have children or pets. Erect barriers or coverings to prevent accidents and ensure proper supervision around water features. Additionally, check local regulations or consult professionals to ensure compliance with safety standards when building and maintaining water features.

Conclusion

Embrace the tranquility of nature with skillfully crafted ponds and water features in your garden. From meticulous design and construction to routine maintenance and seasonal care, these aquatic marvels infuse serenity and visual allure, enriching your outdoor haven. Whether it’s the soothing sound of flowing water or the vibrant life thriving within, water features bring an enchanting dimension to your garden’s landscape.

Happy Gardening!

Harvesting Nature’s Sweetness: A Guide to Growing Fruit Plants in Your Garden!

Introduction:

Growing fruit plants in your garden is a delightful and rewarding experience, offering a bounty of fresh, flavorful produce right at your doorstep. From luscious berries to succulent citrus, here’s your comprehensive guide to cultivating fruit-bearing plants in your outdoor space.

Choosing the Right Fruit Plants:

Selecting suitable fruit plants for your garden largely depends on your climate, soil conditions, and available space If you live in a cold climate, some popular options for growing your own fruit include apple trees, blueberry bushes, raspberry canes, grapes, dwarf citrus trees, and strawberry patches. On the other hand, if you live in an area with high temperatures, you might want to consider growing mangoes, bananas, jackfruits, oranges, guavas, and sapodilla. These plants also require very little water. To enjoy a bountiful harvest sooner, consider buying grafted plants. Consider the specific needs of each plant and how they align with your garden environment.

Site Selection and Preparation:

Ensure your chosen area receives adequate sunlight, as most fruit plants thrive in full sun. Proper drainage is crucial, so amend the soil if needed and consider raised beds for better drainage. Clear the site of weeds and debris before planting to create an optimal growing environment for your fruit plants. If you have limited space or are growing on a balcony or terrace, consider using grow bags to easily move your plants according to their needs.

Planting and Maintenance:

Follow planting guidelines specific to each fruit variety, considering spacing and depth requirements. Regular watering, especially during the establishment phase, is essential. Mulching helps retain moisture and suppress weeds, while fertilizing and pruning, according to plant type, encourages healthy growth and higher yields.


Similar Posts


Pollination and Care:

Understand the pollination needs of your fruit plants; some require cross-pollination for fruit set. Encourage pollinators like bees by planting pollinator-friendly flowers nearby. Protect your plants from pests and diseases by maintaining good garden hygiene and using organic pest control methods.

Harvesting and Enjoying:

Patience is a virtue in fruit gardening; wait for fruits to ripen fully before harvesting. Regularly check for ripe produce, and handle fruits delicately to prevent damage. Indulge in the joy of tasting freshly picked fruits from your garden, knowing they’re free from chemicals and bursting with natural flavors.

Preserving and Sharing:

Preserve surplus fruits by freezing, canning, or making jams and preserves. Share your bounty with friends and neighbors, spreading the joy of homegrown goodness and fostering a sense of community through your garden’s harvest.

Conclusion:

Cultivating fruit plants in your garden is a journey filled with both challenges and rewards. Whether you’re a seasoned gardener or a novice, the satisfaction of nurturing plants and reaping the fruits of your labor is unparalleled. With careful planning, proper care, and a dash of patience, your garden can transform into a thriving orchard, providing an abundance of delicious fruits for years to come. Happy gardening and savor the fruits of nature’s labor in your own backyard!

Happy Gardening!

Rain Lily: Nature’s Delicate Beauties Flourishing in Rainfall Splendor!

Introduction

Rain lilies, botanical wonders celebrated for their ephemeral beauty, emerge as nature’s delightful response to rainfall. These dainty flowers, scientifically known as Zephyranthes, captivate with their ethereal charm, gracing gardens with a burst of color after a refreshing downpour. Let’s delve into the enchanting world of rain lilies and explore their unique characteristics, cultivation tips, and the magic they bring to landscapes.

Rain Lily Origins and Characteristics:

Originating from the Amaryllidaceae family, rain lilies earned their name from their propensity to bloom shortly after rainfall. These petite flowers, typically 2 to 3 inches wide, display an array of hues, including white, pink, yellow, and lavender. Their delicate, star-shaped petals gracefully unfurl atop slender stems, creating a mesmerizing visual spectacle in gardens.

Cultivation and Care:

Thriving in well-draining soil and basking in full sun or partial shade, rain lilies are versatile and low-maintenance additions to gardens. Planting them in clusters or groups enhances their visual impact, and they effortlessly complement borders, rock gardens, and container plantings. They are ideal for regions with warm climates, displaying their floral splendor in rainy season.


Similar Posts


Rain Lily Varieties and Adaptability:

Zephyranthes encompasses numerous species and hybrids, offering a diverse palette of colors and sizes. From the vibrant Zephyranthes grandiflora to the delicate Zephyranthes candida, these flowers adapt to various climates, including tropical and subtropical regions. Their adaptability to diverse environments contributes to their popularity among gardeners worldwide.

Symbolism and Cultural Significance:

Beyond their ornamental value, rain lilies carry symbolic significance in various cultures. Renowned for their fleeting beauty, they symbolize rejuvenation, renewal, and the ephemeral nature of life. In some cultures, these blossoms represent purity and the transient beauty found in life’s fleeting moments, evoking a sense of appreciation for the present.

Conclusion:

Rain lilies, with their ephemeral charm and vibrant hues, stand as nature’s poetic response to rainfall, adding an enchanting touch to gardens worldwide. Their effortless beauty, adaptability, and symbolic significance make them not just botanical marvels but also reminders of life’s fleeting yet beautiful moments.

Whether adorning landscapes with their subtle elegance or symbolizing the transient nature of existence, rain lilies enchant gardeners and nature enthusiasts alike. Embrace the fleeting beauty of rain lilies, and let them grace your garden with their ephemeral yet captivating presence.

In a world shaped by impermanence, rain lilies stand as a testament to nature’s transient splendor, inviting us to revel in life’s fleeting moments and find beauty in every rainfall.

Their brief but breathtaking appearance serves as a reminder to cherish life’s transient joys and appreciate the ever-changing canvas of nature’s artistry. Discover the delicate allure of rain lilies and embrace their ephemeral beauty in your garden sanctuary.

Happy Gardening!