Adenium Care Guide: Tips for Nurturing Healthy and Vibrant Desert Roses!

Introduction:

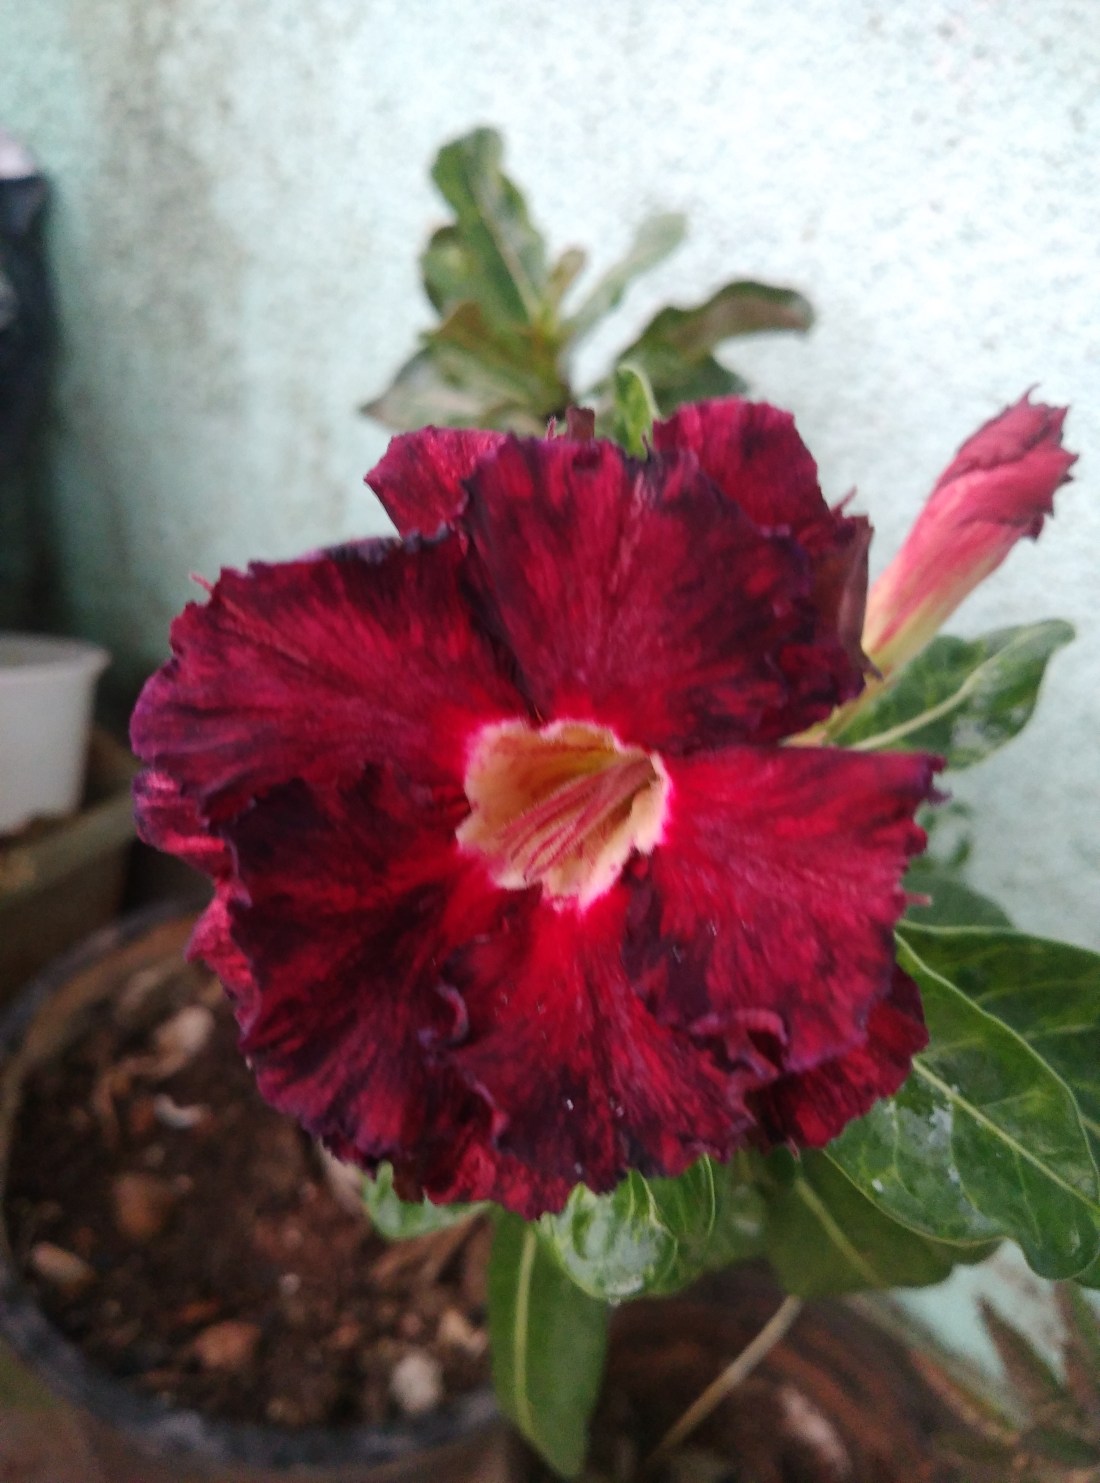
Adenium, commonly known as desert roses or mock azaleas, are fascinating and unique succulents that captivate the hearts of plant enthusiasts around the world. Originating from arid regions, these remarkable plants have adapted to thrive in harsh conditions. Whether you’re a seasoned plant lover or a beginner, this comprehensive Adenium care guide will provide you with valuable insights to help your desert rose to flourish.

1.Choosing the Right Location:

Selecting an appropriate location is the foundation of successful Adenium care. These sun-loving plants require ample sunlight to thrive. Opt for a spot where they can receive at least 6 to 8 hours of direct sunlight each day. A south or west-facing window or a well-lit balcony is ideal for providing the necessary sunlight.

2.Soil and Potting:

Well-draining soil is a must for Adeniums. A mixture of cactus or succulent potting mix combined with perlite or sand works well. Ensure the pot has proper drainage holes to prevent waterlogging, which can lead to root rot. Adeniums like to be a bit root-bound, so choose a pot that is slightly smaller than what you would typically use for a plant of its size. This encourages better flowering.

3.Watering Wisely:

Adeniums are adapted to surviving in arid conditions, so they are accustomed to infrequent but deep watering. In between watering sessions, let the soil to totally dry out completely. Root rot might result from the frequent practice of overwatering. During the active growing season (spring and summer), water once every 10-14 days, and reduce frequency during the dormant period (fall and winter).

4.Temperature and Humidity:

These desert plants thrive in warm temperatures. Aim for a range between 70°F to 90°F (21°C to 32°C) during the day and slightly cooler temperatures at night. Adeniums appreciate low humidity, so they are well-suited to dry indoor environments. Avoid placing them in areas with high humidity, as it can increase the risk of fungal issues.

5.Fertilization:

Feeding your Adenium is essential for robust growth and vibrant blooms. Use a balanced, diluted liquid fertilizer formulated for cacti and succulents. During the active growing season, fertilize every 4-6 weeks. Reduce or stop fertilizing during the dormant period to allow the plant to rest.


Similar Posts


6.Pruning and Shaping:

Pruning is crucial for maintaining an attractive shape and encouraging branching. Pinch off the tips of young stems to promote bushier growth. Remove any dead or yellowing leaves to prevent pests and diseases from taking hold.

7.Pests and Diseases:

Keeping an eye out for pests like aphids, mealybugs, and spider mites is vital. Regularly inspect your Adenium and treat any infestations promptly with insecticidal soap or neem oil. Proper care, including well-draining soil and appropriate watering, can help prevent root rot and fungal issues.

8.Propagation:

Adeniums can be propagated through seeds or stem cuttings. For stem cuttings, allow the cut end to dry and callous before planting in well-draining soil. Propagation is best done during the active growing season for higher success rates.

9.Repotting:

Adeniums generally don’t require frequent repotting. Repot only when the plant becomes severely root-bound or when you notice it’s struggling. Repotting is best done in the spring, before the active growing season. Repotting every 2-3 years or when the plant outgrows its container helps promote healthy growth.

10.Dormancy:

Adeniums naturally go through a period of dormancy, usually during the fall and winter. During this time, reduce watering and cease fertilization. Place the plant in a slightly cooler location, but protect it from frost.

Remember that adeniums might not bloom consistently throughout the year. Their blooming is influenced by factors like age, health, light, and temperature. With proper care and patience, you can encourage your adenium to produce beautiful blooms when its blooming season arrives.

Conclusion:

Adeniums are captivating and rewarding plants that can thrive with the right care and attention. By providing them with proper sunlight, well-draining soil, careful watering, and regular maintenance, you can enjoy a stunning display of their unique caudex and colorful blooms. Remember that each plant is unique, so observing your Adenium’s specific needs will ensure a thriving and beautiful desert rose in your collection.

Happy Gardening!

“Green Thumbs Up: Avoid These 11 Common Gardening Mistakes for a Blooming Garden!”

Introduction

Gardening is not just a hobby; it’s a therapeutic experience that allows us to reconnect with nature. It’s an art form, and like any art, it requires a careful hand and a discerning eye. Whether you’re a seasoned gardener or a novice, tending to plants can be incredibly rewarding. While the joys of cultivating your own green oasis are unparalleled, even the most seasoned green thumbs make mistakes from time to time. In this article, we’ll explore the 11 biggest gardening mistakes you should never make if you want your garden to flourish. Avoiding these pitfalls will help you achieve a vibrant and thriving garden that will be the envy of your neighbors.

1.Neglecting Soil Health

Your garden’s success begins with the soil beneath your feet. Neglecting soil health is one of the most common gardening mistakes. Before planting anything, take the time to test your soil’s pH and nutrient levels. You can easily correct imbalances by adding organic matter or soil amendments. Healthy soil ensures that your plants receive the nutrients they need for robust growth. Remember, happy soil equals happy plants!

2.Overwatering or Underwatering

Maintaining proper soil moisture is crucial for plant health. Overwatering can lead to root rot and other fungal issues, while underwatering can cause stress and wilting. To avoid these problems, learn the specific water requirements of your plants. Invest in a moisture meter to accurately gauge soil moisture levels. Additionally, consider mulching around your plants to retain moisture and reduce evaporation.

3.Ignoring Plant Spacing

In the excitement of gardening, it’s easy to overcrowd plants. However, ignoring proper plant spacing can lead to competition for resources like sunlight, water, and nutrients. This can stunt the growth of your plants and make them more susceptible to pests and diseases. Always follow the recommended spacing guidelines on seed packets or plant labels to ensure your garden thrives.

4.Choosing the Wrong Plants

Not all plants are created equal, and not all thrive in your specific climate or soil conditions. Picking the wrong plants for your garden is like setting yourself up for failure. Research and select plants that are well-suited to your location, considering factors like hardiness zones, sunlight, and water requirements.

5.Skipping Pest and Disease Management

Pests and diseases are natural adversaries in the garden. Ignoring them is a grave mistake that can devastate your plants. Implement a proactive approach to pest and disease management by regularly inspecting your garden. Identify problems early and use organic or chemical solutions as needed. Companion planting and natural predators like ladybugs can also help keep pest populations in check.

6.Overfeeding with Fertilizers

More isn’t always better when it comes to fertilizing. Overusing fertilizers can lead to nutrient imbalances, soil degradation, and harm to beneficial organisms. Follow recommended fertilization guidelines for your plants and consider using slow-release or organic fertilizers for sustained nourishment.


Similar Posts


7.Pruning Without Purpose

Pruning is an essential part of garden maintenance, but it should be done with care and intention. Random or excessive pruning can damage your plants. Learn the proper techniques for each plant type and prune strategically to promote healthy growth, remove dead or diseased material, and shape your plants as desired.

8.Neglecting Weeding

Weeds are stealthy invaders that compete for resources and harbor pests. Neglecting weeding is an open invitation to trouble. Regularly remove weeds to give your plants the space and resources they need to thrive. Mulching can also help suppress weed growth.

9.Disregarding Seasonal Care

Each season brings its own set of tasks in the garden. Neglecting seasonal care, like winter protection or summer shade, can leave your plants vulnerable to harsh weather conditions. Stay attuned to your garden’s needs throughout the year to ensure its continuous health and vitality.

10.Skipping Education and Planning

One of the most significant mistakes you can make is to jump into gardening without proper education and planning. Take the time to research and plan your garden carefully. Knowledge is your best tool in gardening.

11.Neglecting Routine Care

Once your garden is established, it requires ongoing care. Regular maintenance being neglected is a common mistake. Understand the needs of your chosen plants, create a layout, and develop a maintenance schedule. Dedicate time to garden upkeep to enjoy a flourishing, vibrant garden year-round.

Conclusion

Gardening is a fulfilling and rewarding pursuit that allows you to create a vibrant and beautiful outdoor space. By avoiding these 11 common gardening mistakes—neglecting soil quality, over or underwatering, ignoring plant spacing, choosing the wrong plants, neglecting pest and disease control, overfeeding with fertilizers, pruning without purpose, neglecting weeding, disregarding seasonal care, skipping education and planning, and, neglecting routine care —you’ll be well on your way to cultivating a garden that thrives year after year. So, put on your gardening gloves, and remember, with a little knowledge and care, your green thumbs can yield a flourishing paradise right in your backyard.

Happy gardening!

The Art of Soil Enrichment: Building and Maintaining Nutrient-Rich Soil

Introduction

Hello, fellow gardeners and nature enthusiasts! Welcome to a journey that will uncover the secrets of creating and sustaining nutrient-rich soil – the foundation of a thriving garden. In this article, we’ll delve into the fascinating world of soil enrichment, exploring techniques and practices that will transform your garden into a haven of lush, vibrant plant life. Whether you’re a seasoned gardener or just starting out, understanding the art of soil enrichment can make a world of difference in your gardening success.

1. The Essence of Nutrient-Rich Soil

Picture this: a garden where plants grow vigorously, blossoming with vivid colors and yielding bountiful harvests. The magic behind this enchanting scenario lies in the soil. Nutrient-rich soil provides plants with the essential elements they need to flourish – think of it as a balanced meal for your plants. These nutrients include nitrogen, phosphorus, potassium, and a variety of micronutrients that facilitate growth, flowering, and fruiting.

2. Building Nutrient-Rich Soil

Composting: One of the fundamental ways to enrich soil is through composting. Gather kitchen scraps, yard waste, and even paper products to create a compost pile. Over time, these materials decompose into nutrient-rich organic matter, infusing your soil with vitality.

Cover Cropping: Another technique involves planting cover crops like clover or legumes during the off-season. These crops not only prevent soil erosion but also fix nitrogen in the soil, enhancing its fertility.

3. The Role of Mulching

Mulching isn’t just about aesthetics – it plays a pivotal role in soil enrichment. Mulch acts as a protective barrier, regulating soil temperature, retaining moisture, and preventing weed growth. Organic mulches, such as straw, coconut chips or wood chips, gradually break down, adding valuable nutrients to the soil in the process.

4. Incorporating Organic Matter

Introducing organic matter into your soil is like treating it to a nourishing spa day. Compost, well-rotted manure, and leaf litter enhance soil structure, allowing for improved water retention and aeration. This invites beneficial microorganisms that aid in nutrient breakdown and absorption by plants.

5. Smart Fertilization

While organic methods are excellent for long-term soil health, there’s a place for balanced fertilization. Choose fertilizers with the right N-P-K ratio (nitrogen, phosphorus, potassium) for your plants’ needs. Slow-release fertilizers provide a steady supply of nutrients, preventing overfeeding and runoff. You can also use Amrit Jal for soil enrichment.

Preparation Of NPK

You can prepare your own NPK fertilizer from kitchen waste. For this, you require 3 ingredients:

  1. Tea leaves (properly washed and dried): For making nitrogen-based fertilizer (for foliage)
  2. Mustard cake: For making phosphorus-based fertilizer (for root growth)
  3. Onion peel/Banana peel(dried): For making potassium-based fertilizer (for blooms)

In a grinder or a mixer, grind each ingredient individually. Mix each of these in an equal ratio. After mixing the three fertilizers, our homemade NPK fertilizer is ready for use. We can now either keep it for the future or use it immediately for our plants.

Preparation of Amrit Jal

Mix cow dung, cow urine, and jaggery in one drum for 3 days and stir 2 to 3 times a day, both clock and anti-clockwise. On the 4th day mix with 50 to 60 liters of water and you will have Amrit Jal ready for use.


Similar Posts


6. Conserving Soil Health

Maintaining nutrient-rich soil is an ongoing process. Rotate your crops to prevent nutrient depletion in specific areas. Avoid excessive tilling, which can disrupt the soil structure and microorganism balance. Instead, practice minimal tillage or no-till gardening to protect the delicate ecosystem underground.

7. Pest control

When it comes to gardening, dealing with pests in the soil is like navigating a tiny underground battlefield! Soil-borne pests, such as root-feeding nematodes, larvae, and harmful microorganisms, can undermine the vitality of garden plants, leading to stunted growth and reduced yields. Natural remedies like beneficial nematodes, compost, and soil amendments play key roles in soil pest control. Crop rotation and interplanting can also disrupt pest life cycles and deter infestations. Additionally, using mulch or protective covers can create physical barriers that keep soil pests at bay.

Conclusion

In the grand tapestry of gardening, nutrient-rich soil forms the very fabric that supports and nourishes plant life. By embracing the art of soil enrichment, you’re not just cultivating a garden – you’re creating a thriving ecosystem where plants, microorganisms, and nutrients harmoniously coexist. So, whether you’re tending to a small backyard plot or a sprawling farm, remember that beneath it all, in the heart of the earth, lies the secret to a flourishing garden – the art of soil enrichment.

Happy Gardening!

The Science of Pruning: Techniques for Healthy and Beautiful Plants Explained

Greetings, fellow gardeners! Have you ever wondered how professional landscapers achieve those perfectly shaped and vibrant plants? The answer lies in the art and science of pruning. Whether you’re tending to your backyard or nurturing indoor plants, mastering pruning techniques can work wonders for the health and beauty of your green companions. Let’s delve into the science behind pruning and uncover techniques that will elevate your gardening game.

  • Understanding the Basics of Pruning

Pruning is more than just snipping away excess growth. It involves strategic removal of branches and leaves to encourage healthy growth, enhance plant shape, and improve overall aesthetics. By understanding a plant’s growth patterns and needs, you can tailor your pruning approach for maximum benefit.

  • Timing is Key

In the diverse climate of India, timing is crucial when it comes to pruning. Generally, the best time is during the dormant season, which is usually just before the onset of spring. This ensures that plants can recover quickly and put forth new growth as the weather warms up.

  • Tools of the Trade

Equipping yourself with the right tools is a prerequisite for effective pruning. For small branches and delicate plants, opt for pruning shears. For thicker branches, invest in loppers or pruning saws. Keep your tools sharp and clean to prevent damaging the plants.

  • Shape Up with Thinning

Thinning involves removing entire branches at their point of origin. This technique improves air circulation, reduces disease risk, and encourages new growth. It’s particularly beneficial for fruit-bearing trees like mangoes and guavas, promoting larger and healthier yields.

  • Pinching for Precision

Pinching is a technique primarily used for promoting bushier growth in plants with multiple stems. Simply pinch off the tip of new growth between your thumb and forefinger. This encourages branching and leads to denser foliage, perfect for ornamental plants like roses, and chrysanthemums.


Similar Posts


  • Heading Back for Growth Control

Heading back entails cutting back the tip of a stem to a bud or side branch. This technique controls the size of the plant and stimulates fresh growth. It’s handy for shaping hedges, keeping shrubs in check, and maintaining compactness.

  • Deadheading for Continued Blooms

Deadheading involves removing spent flowers to encourage continuous blooming. This prevents plants from expending energy on seed production, redirecting their resources toward more blooms. Ideal for flowering plants like zinnia, marigolds and petunias, deadheading keeps your garden vibrant and colorful.

  • Training Vines and Climbers

For climbers and vines, pruning helps control their growth and shape. Regularly remove old or dead growth to allow sunlight to reach the inner foliage. This maintains a healthy structure and ensures optimal flowering.

  • Watch for Disease and Decay

During pruning, keep an eye out for signs of disease, infestation, or decay. Promptly remove affected parts to prevent the problem from spreading to healthy areas. This proactive approach safeguards the overall well-being of your plants.

  • Embrace Patience and Practice

Remember, pruning is both a science and an art. It takes practice to become adept at understanding each plant’s unique requirements. Over time, you’ll develop an intuitive sense of how to best nurture your garden through well-timed and skillful pruning.

Conclusion

By incorporating these pruning techniques into your gardening routine in India, you’re not just nurturing healthier plants, but also crafting a visually appealing landscape. With a little knowledge and a lot of love, you can master the science of pruning and transform your garden into a flourishing haven of beauty. Happy pruning!

Happy Gardening!

A Comprehensive Guide to Growing Plants with Cuttings: Tips for Success!!

Introduction

Growing plants from cuttings is a rewarding and cost-effective way to expand your garden and enjoy a bountiful harvest. This propagation method allows you to reproduce your favorite plants, maintain their characteristics, and save money on purchasing new plants. In this guide, we’ll delve into the world of plant propagation through cuttings and provide you with valuable insights and tips for a successful journey.

Understanding Plant Cuttings

Plant cuttings are small sections of a parent plant that are removed and cultivated to develop into new, independent plants. This method is widely used for a variety of plants, including flowers, herbs, shrubs, and even some trees. There are different types of cuttings, each with its own benefits:

  1. Softwood Cuttings:

Taken from the new, flexible growth at the tips of branches. These cuttings root quickly and are commonly used for plants like herbs and ornamental plants.

  1. Hardwood Cuttings:

Collected from mature, woody stems during the dormant season. These cuttings take longer to root but are often used for deciduous shrubs and trees.

  1. Semi-Hardwood Cuttings:

 Collected from partially mature stems. This type of cutting strikes a balance between softwood and hardwood cuttings and is suitable for a variety of plants.

  1. Leaf Cuttings:

 In this method, individual leaves or leaf sections are used to propagate new plants. It is commonly used for succulents and some tropical plants.

  1. Root Cuttings:

Sections of roots are used to create new plants. This method is commonly used for perennial plants.

Step-by-Step Propagation Process

  1. Preparation:

Select healthy parent plants that are free from pests and diseases. Prepare clean, sharp tools for taking cuttings.

  1. Selection of Cuttings:

Choose young, healthy shoots that are free from flower buds. Cut just below a node, which is the point where leaves emerge from the stem.

  1. Preparation of Cuttings:

 Trim the cutting, removing any excess leaves or flowers. Dip the cut end into rooting hormone to promote root growth.

  1. Planting Medium:

Choose a well-draining planting medium such as a mix of peat, perlite, and vermiculite. Insert the cuttings into the medium, ensuring that at least one node is below the surface.

  1. Rooting Environment:

Place the cuttings in a warm, humid environment with indirect light. You can cover them with a plastic dome or place them in a clear plastic bag to create a mini greenhouse.

  1. Watering:

Keep the medium consistently moist but not waterlogged. Mist the cuttings regularly to maintain humidity.

  1. Root Development:

After a few weeks to months, you’ll notice roots developing. Gently tug on the cuttings to check for resistance, indicating root growth.

  1. Transplanting:

Once roots are well-developed, transplant the cuttings into individual pots filled with a suitable potting mix.


Similar Posts


Tips for Success

  • Timing:

Take cuttings during the plant’s active growth period for the best chance of success.

  • Equipment:

Use clean, sharp tools to avoid damaging the plant tissue.

  • Rooting Hormone:

While not always necessary, rooting hormone can significantly increase your success rate.

  • Humidity:

Maintain high humidity around the cuttings to prevent moisture loss.

  • Light:

Provide indirect light to promote root growth while preventing excessive transpiration.

  • Patience:

 Rooting and growth can take time, so be patient and monitor your cuttings regularly.

Season

The best season for growing plants from cuttings can vary depending on the type of plant you’re propagating. However, in general, the monsoon and early spring seasons tend to be the most favorable for propagating plants from cuttings.

However, it’s important to note that the best season for propagating plants can also depend on the specific plant species. Some plants may have different preferences or may be more forgiving in terms of when they can be propagated. Always research the specific needs of the plant you’re trying to propagate to ensure the best chance of success.

Conclusion

Growing plants from cuttings is a fulfilling way to expand your garden and enjoy the beauty of nature. By understanding the different types of cuttings, following the step-by-step process, and implementing the tips provided, you’ll increase your chances of successfully propagating a wide range of plants. Embrace this technique and watch your garden flourish with new life and vibrancy.

Happy Gardening

The Ultimate Guide to Growing Plants from Seeds – Tips for a Bountiful Garden!!

Introduction

Growing plants from seeds is a gratifying and cost-effective way to establish a vibrant garden. It’s a journey that allows you to witness the miracle of life as tiny seeds transform into thriving plants. Whether you’re a novice gardener or a seasoned pro, this comprehensive guide will provide you with valuable insights and tips to ensure successful seed germination and plant growth.

1. Choosing the Right Seeds

Selecting the appropriate seeds is crucial for a successful gardening experience. Consider the climate, soil type, and available sunlight in your area. Opt for seeds that are well-suited to your local conditions. This not only improves the chances of successful germination but also contributes to the long-term health of your plants.

2. Quality Soil Matters

Prepare a nutrient-rich, well-draining soil mix to give your seeds the best start. A mixture of compost, peat moss, and perlite can create an ideal medium for seed germination. Ensure that the soil is loose and fine-textured to promote root growth.

3. Planting Depth and Spacing

Each type of seed has its own ideal planting depth and spacing requirements. Follow the instructions on the seed packet carefully. Planting seeds too deep or too shallow can hinder germination. Proper spacing prevents overcrowding and allows each plant enough space to thrive.

4. Watering Techniques

Consistent and appropriate watering is key to seed germination. Use a fine mist or a gentle spray to avoid displacing seeds. Always keep the soil moist, but not soggy. A spray bottle can be a handy tool to maintain proper moisture levels without overwatering.

5. Temperature and Light Conditions

Temperature and light play significant roles in seed germination. Most seeds require warmth to sprout. Using a seed-starting heat mat can provide the optimal temperature range for germination. Additionally, ensure that your seeds receive sufficient light. Placing them near a south-facing window or using fluorescent grow lights can provide the necessary light spectrum for healthy growth.


Similar Posts


6. Hardening Off

Before transplanting your seedlings outdoors, they need to acclimate to the outdoor conditions. This process, known as “hardening off,” involves gradually exposing the plants to sunlight, wind, and varying temperatures. Start with short periods of outdoor exposure and gradually increase the time over a week or two.

7. Transplanting with Care

When your seedlings have grown sturdy enough, it’s time to transplant them into your garden. Choose an overcast day or transplant in the evening to minimize stress on the plants. Gently remove the seedlings from their containers, being careful not to disturb the roots, and plant them at the appropriate depth.

8. Mulching and Maintenance

Mulching helps retain soil moisture, suppress weed growth, and regulate soil temperature. Apply a layer of organic mulch around your plants once they’re established. Regularly monitor the garden for pests and diseases, and take prompt action if any issues arise.

9. Patience and Observation

Growing plants from seeds requires patience and careful observation. Monitor your plants regularly for any signs of distress or nutrient deficiencies. Adjust your watering and fertilization routines as needed.

10. Enjoy the Fruits of Your Labor

As your plants grow and flourish, take time to revel in the beauty and satisfaction of a thriving garden. The process of growing plants from seeds not only yields beautiful blooms or delicious produce but also teaches valuable lessons about nature and the cycle of life.

Conclusion

Growing plants from seeds is an immensely rewarding endeavor that offers a sense of accomplishment and a deeper connection to nature. By following these tips, you can master the art of seed germination and enjoy the fruits of your labor as your garden flourishes with vibrant colors, lush foliage, and delicious harvests. Remember, each seed you plant is a small investment in the future beauty and vitality of your garden.

Happy gardening!

The Art and Science of Grafting: A Comprehensive Guide!

Introduction:

Grafting, a time-honored horticultural technique, is the secret behind creating magnificent plant hybrids and ensuring the propagation of desired traits. Whether you’re an aspiring gardener or an experienced horticulturist, understanding the art and science of grafting can open up a world of possibilities for enhancing plant growth, yield, and resilience. In this article, we’ll delve into the fundamentals of grafting, its benefits, various grafting methods, and essential tips for successful grafting.

The Fundamentals of Grafting:

 Grafting is the process of joining a scion (desired plant part) with a rootstock (established root system), resulting in the fusion of the two to create a single plant. This technique is widely used to combine desirable traits from different plants, such as disease resistance, fruit quality, or growth habits, to produce a stronger, more adaptable hybrid.

Benefits of Grafting:

1. Enhanced Plant Performance:

Grafted plants often exhibit improved growth rates, increased yield, and overall better health due to the combination of strong root systems and desired scion traits.

2. Disease Resistance:

    By grafting onto rootstocks that are naturally resistant to certain diseases, you can protect scion plants from infections that would otherwise hinder their growth.

    3. Environmental Adaptability:

     Grafted plants can thrive in diverse soil conditions and climates, thanks to the rootstock’s ability to anchor the plant and provide vital nutrients and water.

    4. Reduced Time to Maturity:

    Grafting can accelerate the time it takes for a plant to reach maturity, leading to earlier harvests and quicker results.

    Common Grafting Methods:

    1. Whip-and-Tongue Grafting:

    This method involves making diagonal cuts on both the scion and rootstock, creating matching “tongues.” The two pieces are then joined together and secured with tape or twine.

    2. Cleft Grafting:

      Suitable for larger rootstocks, this technique entails splitting the rootstock down the middle and inserting the scion into the cleft. The setup is then bound tightly until the graft heals.

      3. Budding:

      Unlike other methods, budding involves placing a single bud (with little or no wood) from the scion onto the rootstock. This is particularly useful for species that are harder to graft.

      4. Side-veneer Grafting:

      This method is ideal for plants with varying stem diameters. A vertical cut is made in the rootstock, and a matching slice of the scion is inserted.


      Similar Posts


      Tips for Successful Grafting:

      • Choose Compatible Partners:

      Ensure that the scion and rootstock are closely related and compatible in terms of size, growth rate, and physiological requirements.

      • Proper Timing:

      Graft during the plant’s active growing season for optimal success. Timing may vary depending on the plant species and grafting method.

      • Sterilize Tools:

      Use clean, sharp tools to prevent introducing infections to the graft site. Sterilize tools between cuts to reduce the risk of disease transmission.

      • Secure Graft Properly:

      Use appropriate materials like grafting tape or rubber bands to firmly hold the graft in place while allowing for proper healing.

      • Provide Adequate Care:

      Protect grafted plants from stressors such as extreme temperatures or excessive sunlight during the healing process. Regularly monitor their progress and make adjustments if necessary.

      Conclusion:

      Grafting is both an art and a science that allows horticulturists to achieve remarkable results in plant cultivation. By understanding the basics of grafting, its advantages, and the different grafting techniques, you can unlock the potential for creating healthier, more resilient, and highly productive plants. Whether you’re looking to experiment with unique hybrids or improve the performance of your existing garden, grafting is a valuable technique to master.

      Happy Gardening!

      Crafting Bonsai Masterpieces: A Step-by-Step Guide to Making Breathtaking Bonsai Trees!

      Introduction:

      Bonsai, an ancient art form from Japan, is a fascinating way to cultivate miniature trees that has been captivating gardening enthusiasts for centuries. The term “bonsai” comes from the combination of two Japanese words, “Bon” (meaning shallow pan) and “Sai” (meaning plant). By growing trees in shallow containers, their growth is controlled or stunted without starving the plant. A delicate balance between nature and human intervention creates awe-inspiring masterpieces that exude elegance and tranquility. If you’re interested in exploring the world of bonsai, this comprehensive guide will take you through every step of the process, from selecting the right tree to nurturing its growth and shaping it into a living work of art.

      1. Start by learning about bonsai.

      Research different tree species suitable for bonsai, their care requirements, and the techniques involved in shaping and maintaining them. There are many books, online resources, and local bonsai clubs that can provide valuable information and guidance.

      2. Gather Materials:

      Collect the necessary materials, including a suitable bonsai pot, bonsai soil mix (usually a mixture of Akadama, pumice, and lava rock), bonsai wire for shaping, pruning tools (sharp scissors, concave cutters, branch cutters), and potentially root rake and tweezers.

      3. Choosing the Perfect Bonsai Tree:

      Selecting the right tree is the key to successful bonsai making. The most crucial factor to consider when choosing a plant for bonsai is its hardiness. It should be able to withstand the challenges of shallow container growing, harsh training, and root and branch cutting without losing its vitality. A good bonsai specimen should have a natural-looking trunk that complements the container it is grown in. The branches should also have an artistic rhythm that enhances its aesthetic value. Trees with sturdy, thick trunks at ground level are particularly pleasing. Plants that display seasonal changes in growth pattern and flowering are highly prized in bonsai culture.

      For instance, trees that produce fruit in one season or alter the color of their leaves in another season all contribute color to the collection.

      Some examples include Ficus religiosa, Bombax malabaricum, Callistemon lanceolatus, Kigellia pinnata, Milletia ovalifolia, Punica granatum, Jacaranda mimodsifolia, and F. benghalensis.

      4. Starting with Seedlings or Nursery Plants:

      For beginners, starting with pre-grown seedlings or nursery plants is recommended. These plants have already undergone some initial growth, making them easier to manage and shape. As you gain experience, you can experiment with growing bonsai from seeds or cuttings.

      5. Soil and Pot Selection:

      Choosing the right soil mixture is crucial for the health and development of your bonsai. A well-draining soil mix with good water retention capabilities is essential. Additionally, select a pot that complements the size and style of your tree. Bonsai pots are often shallow and have drainage holes to prevent overwatering.

      6. Pruning and Shaping:

      Pruning is one of the most important techniques in bonsai making. Regularly trim the branches and roots to maintain the desired shape and size. Use bonsai-specific tools like concave cutters and branch cutters for precise cuts. Shaping wires can be gently wrapped around branches to guide their growth and create the desired aesthetics.


      Similar Posts


      7. Wiring and Styling:

      Wiring is a skill that requires practice and finesse. Use aluminum or copper wires to gently bend and position branches. Be cautious not to leave wires on for too long, as they can cut into the bark. As you wire and style your bonsai, strive for natural, balanced proportions that mimic the appearance of mature trees.

      8. Watering and Fertilizing:

      Proper watering and fertilization are essential for the health of your bonsai. Water your tree when the top layer of soil becomes slightly dry. Fertilize during the growing season to provide the necessary nutrients for growth. Use a balanced liquid fertilizer or specialized bonsai fertilizer according to the manufacturer’s instructions.

      9. Repotting:

      Bonsai trees require periodic repotting to refresh the soil, trim roots, and encourage new growth. Repot every 1 to 3 years, typically during the spring. Gently remove the tree from its pot, trim the roots, and replant it in fresh soil. Repotting allows your bonsai to thrive and prevents it from becoming root-bound.

      10. Patience and Dedication:

      Bonsai making is an art that requires patience and dedication. Trees evolve slowly, and achieving the desired results may take years. Regularly observe your bonsai’s growth and make adjustments as necessary. Over time, you’ll develop a deeper understanding of your tree’s unique characteristics and needs.

      11. Learn and Adapt:

      Bonsai making is an ongoing learning process. Pay attention to how your tree responds to different techniques, environments, and care routines. Adapt your approach based on the tree’s needs and your observations.

      12. Join Bonsai Communities:

      Engage with local bonsai clubs or online communities. Connecting with fellow enthusiasts can provide you with valuable advice, tips, and a supportive network to share your progress and learn from others’ experiences.

      Conclusion:

      Crafting a bonsai is a rewarding journey that combines horticulture, artistry, and mindfulness. Through careful cultivation, shaping, and nurturing, you can transform an ordinary tree into a breathtaking work of art that captures the essence of nature’s beauty. As you embark on your bonsai-making adventure, remember that every cut, wire, and bend contributes to the creation of a living masterpiece that will inspire awe for generations to come.

      Happy Gardening!

      The Ultimate List Of 15 Drought-Tolerant Plants Perfect for Your Low-Maintenance Garden!

      Are you tired of constantly watering your garden and watching your plants wilt under the scorching sun? Well, we’ve got some good news for you! Creating a vibrant and lush garden doesn’t have to be a water-intensive chore. By choosing drought-tolerant plants, you can have a stunning garden that thrives even in the hottest and driest conditions. Let’s explore some fantastic options that will transform your outdoor space into a low-maintenance heaven.

      1. Bougainvillea: Burst of Color Bougainvillea, with its vibrant hues, is a showstopper in any garden. These hardy plants are well-suited for India’s arid climate. Once they are established, they need very little watering. Their paper-like bracts come in various shades, bringing an explosion of color to your garden without demanding constant attention.
      2. Succulents: Beauty in Diversity Succulents are all the rage in gardening and for a good reason. With an array of shapes and sizes, these water-storing plants thrive in summer dry spells. From the iconic aloe vera to the charming echeverias, succulents add texture and intrigue to your garden while needing only occasional watering.
      3. Zinnias: Sun-Kissed Delight Zinnias are a go-to choose for those seeking a burst of color without the fuss. These cheerful flowers come in various warm shades and can handle India’s heat with grace. Zinnias are not picky about soil types and can bloom all season long, making them a perfect low-maintenance addition to your garden.
      4. Curry Leaf Plant: Fragrant and Useful The curry leaf plant not only brings an aromatic touch to your garden but also holds culinary significance. These hardy plants thrive in hot climate and require infrequent watering once established. With proper care, they can flourish for years, providing you with a steady supply of fresh curry leaves.
      5. Portulaca: Beauty in Simplicity If you’re looking for a plant that can withstand neglect and still thrive, portulaca is your answer. These colorful little blooms are drought-resistant and can tolerate poor soil conditions. Their low-growing nature makes them perfect for ground cover, adding a carpet of vibrant hues to your garden.
      6. Agave: Majestic Elegance For a touch of desert beauty, consider planting agaves. These architectural wonders require very little water and can add a dramatic focal point to your garden. Their unique shapes and sizes create an eye-catching display that’s sure to impress.
      7. Cacti: Endearing and Resilient No list of drought-tolerant plants would be complete without cacti. These iconic plants are built to withstand the toughest conditions. From prickly pears to barrel cacti, they come in various forms and sizes, adding a touch of the wild to your garden.
      8. Aloe Vera: Nature’s Healer Aloe vera is not just a skincare gem; it’s a low-maintenance superstar. Its fleshy leaves store water, keeping it fresh even during India’s hottest days.
      9. Vinca: Effortless Enchantment Vinca’s charming blooms thrive in the face of water scarcity. Their adaptability and resilience ensure a colorful garden all season long.
      10. Snake Plant: Stylish and Sturdy Bring some contemporary flair with snake plants. Their striking vertical leaves and minimal water needs make them ideal for modern Indian gardens.
      11. Sedum: Beauty in Simplicity Sedums come in various shades and shapes, adding elegance to your garden. These low-maintenance succulents can handle dry spells with ease.
      12. Gazania: Sunshine on Display Gazanias open their vibrant petals to the sun, thriving in its warmth. These dazzling blooms require minimal care, giving you maximum beauty.
      13. Oleander: Graceful and Stalwart Oleander’s beauty is matched by its ability to withstand dry conditions. This evergreen shrub adds a touch of elegance to your low-maintenance oasis.
      14. Yucca: Drama and Durability Yuccas bring a touch of drama to your garden with their sword-like leaves. Their water-storing capabilities make them a perfect fit for Indian summers.
      15. Dusty Miller: Silver Elegance Dusty Miller’s silver foliage is a standout in any garden. Its tolerance to dry conditions adds a touch of sophistication to your low-maintenance haven.

      Incorporating drought-tolerant plants into your garden not only saves water but also reduces the need for constant maintenance. With the right choices, you can enjoy a lush and vibrant outdoor space that flourishes even in the driest spells. So, go ahead and transform your garden into a low-maintenance oasis of beauty and resilience.

      Happy Gardening!

      Why You Should Invest Some Time In Gardening?

      Gardening is a great hobby for anyone looking to stay healthy. Not only does gardening help improve mental health, but it also helps lower stress levels. When you spend time outside working in the garden, you release endorphins into your body, which makes you feel happy. This is especially true if you work outdoors in the sunshine.

      In this article, you will come to know how gardening will help you to leave a happy and healthy life. So here is the list of benefits of gardening:

      Makes You Fit

      Photo Courtesy: Pexels

      Gardening involves many activities like bending, lifting, pulling, digging, planting, watering, and weeding. These activities not only burn calories but also help in strengthening our muscles. It also helps in reducing excess weight and improves blood circulation.

      Act As A Natural Anti-Depressant And Makes You More Resilient

      Photo Courtesy: Pexels

      Gardening helps the brain to secrete serotonin a happy chemical, a deficiency that causes depression. This hormone makes you feel happy. When I was going through a rough phase in my life, gardening helped me overcome my grief. The cool breeze passing through the leaves when touches our skin makes us feel refreshed. It feels like someone is consoling us. It takes away all the pain grief and tiredness. It is in my daily routine to water my plants when I return from my 9 to 5 job. It makes me feel more energized by taking away all the tension and pressure faced in my daily life.

      Gardening is also considered an effective rehabilitation tool for people having an addiction.

      Boosts Immunity

      Photo Courtesy: Pexels

      There are three main factors of gardening which help in improving immunity. First is Soil. Soil contains various microbes both good and bad. By working in the soil we become resistant to various skin infections and allergies. The second factor is Sunlight. We have been taught in school that sun rays contain vitamin D so we need to be exposed to sun rays in the morning. Vitamin D absorbs calcium and phosphorous and helps in the growth and strengthening of our bones. The third factor is Air. While gardening we inhale fresh air rich in oxygen, which improves blood circulation and helps in improved brain function.

      To Detoxify Our Body, Mind, And Soul

      Photo Courtesy: Pexels

      As we have discussed earlier by just taking a walk in our garden our minds get refreshed. The oxygen-rich air not only cleanses our bodies but also rejuvenates our souls. There are many medicinal plants that help in cleansing the environment. Exposure to them helps in cleansing our lungs which in turn helps in reducing the chances of getting various types of cancer.

      Improves Memory

      Photo Courtesy: Pexels

      Researchers have found gardening improves cognitive functioning in the brain. Even it is considered an effective treatment for dementia patients.

      All students are aware of the Pomodoro Technique. In this technique we need to study in chunks like 25 min, 40min, or 50 min based on our preference then we need to take a break of 10 minutes. This helps the brain to store information for a longer time. At this time many experts advise taking a walk or having a bath. Because this is the time when information is stored in the long-term memory. Fresh air helps in increasing this process. Spending this free time in your garden will not only help you to remember the concept for a long but will also make you more refreshed.

      To Connect With Mother Nature

      Photo Courtesy: Pexels

      Gardening gives a sense of well-being. People who do gardening cultivate a feeling of connection or you can say it strengthens the unseen bond we have towards nature. It increases our self-esteem. Gives a sense of fulfillment when we grow our own food.

      Showing Gratitude

      Photo Courtesy: Pexels

      Last but not least. Gardening helps us to show gratitude to mother nature. What we eat, what we wear, where we stay, what we learn everything is directly or indirectly derived from nature. By planting some trees we are making a certain contribution to our society. It’s a way of saying thank you to Mother Nature.

      Apart from the above-mentioned benefits, there are many more benefits of gardening. Many schools and colleges are making gardening a part o their curriculum. Even it is encouraged by many mindfulness programs too. So what you are waiting for. Start your own garden and grow your own food.

      Happy Gardening!!!